
Make 12 part 1 Carousel patterns to round 10.
JOIN AS YOU GO ON ROUND 10 side by side in 4 rows of 3 motifs


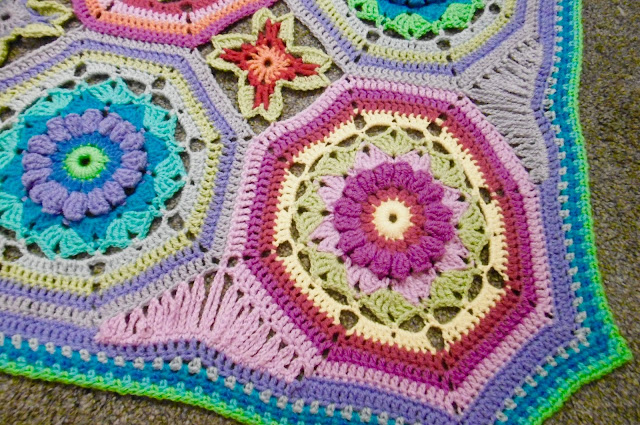
Add the fill in to the 6 'holes' left by joining the 12 centres.


THE FILL IN FOR THE CAROUSEL SECRET BLANKET
UK Terms in red
YARN: Special DK/Batik dk
4mm hook
CHANGE COLOUR FOR EACH ROUND
light colour first, darker shade second, finish with a green shade to join to the 'hole'


MOTIF PATTERN
First colour, 1finger wrap of 4 or 5 wraps or ch4, sl st, into a circle.
Round 1: Basically a first round granny square but with 4dc [4tr], on each side cont. in first colour, ch2 counts as first dc [tr], 3dc [3tr], ch 3 4dc [4tr], repeat 2 more times, sl st, to complete round. (16dc [16tr]

Round 2: Att. new colour, in the first sp between any first 2, dc [tr], with a sc [dc], sc [dc], in the next 2 sp, sc [dc], into the ch3 sp, ch5, 2tr, [2dtr], into same sp, ch5 sc [dc], into same sp, repeat for all 4 sides.

Round 3: attach new colour in the 3rd sc [dc], of the 5sc [5dc],

ch3, 5dc [5tr] into the first ch5 loop, ch3
sc [dc] between the 2tr [2dtr] ch3, 5dc [5tr] into the second ch5 loop, ch3,
sc [dc] into the 3rd sc, [dc] of the row below, repeat 3 more times, sl st, to complete round.
ROUND 3 WILL BE THE JOIN AS YOU GO ROUND
Joining the motif to the holes created when you join the centre PART 1 of the carousel
together
Join to the 'hole' in the 3st, down from the corner
Use a sl st into the 3rd st down, after the 5dc [5tr], before you do the ch3 at the top of the petal, and again after the ch3 and before the 5dc [5tr] of the second side of the petal in the 3rd ch st, down from the corner for each petal.


These Amelia Flower or Amelia Box motif can be joined together to create another design...maybe a scarf or wrap...
as was the original design

SECOND INFILL TRIANGLE PATTERN

Use a sl st into the 3rd st down, after the 5dc [5tr], before you do the ch3 at the top of the petal, and again after the ch3 and before the 5dc [5tr] of the second side of the petal in the 3rd ch st, down from the corner for each petal.

BORDER PATTERN
Round 1: sc [dc], in every st, sc [dc], ch2, sc [dc], in each corner sp, and ch 24 between octagons, sl st to complete round.
Round 2: dc, [tr], in every st, dc [tr], ch2, dc [tr], in every corner, sl st to complete round.
Round 3: Moss stitch rounds from round 3. Start in any corner, sc [dc], ch2, sc [dc], in corner sp, ch1, miss a st, sc [dc] in next st, ch1, miss a st, repeat to next corner, sc [dc], ch2, sc [dc] in every corner sp....repeat to end sl st to complete.


Round 4: start in a corner sc [dc], ch2 sc [dc], ch1, sc [dc], in next ch1 sp, repeat corners and moss st to end, sl st to complete round.
Round 5+: Repeat round 4, add as many rows of moss stitch as you like.
NOTE: Moss stitch can pull up slightly tighter so if your tension is tight then use a bigger hook.
This is a very versatile stitch and by just changing the colour you can create some interesting patterns
TRIANGLULAR 'HOLES' AT THE EDGES
THE SECOND FILL IN WILL BE RELEASED IN NOVEMBER AFTER THE SECOND WORKSHOP
and will be free for all to use on the Secret blanket x
THE ORIGINAL AMELIA FLOWER PATTERN has been adapted These Amelia Flower or Amelia Box motif can be joined together to create another design...maybe a scarf or wrap...
as was the original design
SECOND INFILL TRIANGLE PATTERN

A Simple chai st infil for the outer triangles.....I tried lots of variations, but wasn't happy with any of them until this one, hope you love it as much as me.
THIS IS NOT A CHART
 Just a diagram to help work the stitch count out. There are more sts at the bottom to the top so some become spaces and some are worked one after the other
The 'X' are the missed stitches and the numbers are the chain stitches up and then down again.
PATTERN
25sts across the bottom of the triangle...mark the centre st. helps here.
16 sts each side at the top
Att. yarn to the 3rd st from the corner, ch3, sl st, into the second st from the corner at the top, ch3 return, sc [dc], into the same st,
sc [dc], into the next st, a space, sc [dc], in the next st,
ch4 miss a st at the top sl st into the next st, ch4 return, sl st into the same st,
sc [dc]into the next st, sc [dc], into the next st,
ch5, miss a st, at the top sl st into the next st, ch5 return sl st into the same st,
sc [dc] into he next st, sc [dc] into the next st, ch6, miss a st, at the top, sl st into the next st, ch6 return sl st, into the same st
from now on work into every st at the bottom and keep missing a st between ch loops at the top, until you get to ch6 return,
then its a gap st between loops at the top and the bottom again.
Follow the diagram the 'x' are the missed stitches the ch10 sl st, must go between the join of the original Octagons.
 COLOUR: I used one of the colours of the Octagons but you could use a different colour if you wished


THIS IS NOT A CHART

The 'X' are the missed stitches and the numbers are the chain stitches up and then down again.
PATTERN
25sts across the bottom of the triangle...mark the centre st. helps here.
16 sts each side at the top
Att. yarn to the 3rd st from the corner, ch3, sl st, into the second st from the corner at the top, ch3 return, sc [dc], into the same st,
sc [dc], into the next st, a space, sc [dc], in the next st,
ch4 miss a st at the top sl st into the next st, ch4 return, sl st into the same st,
sc [dc]into the next st, sc [dc], into the next st,
ch5, miss a st, at the top sl st into the next st, ch5 return sl st into the same st,
sc [dc] into he next st, sc [dc] into the next st, ch6, miss a st, at the top, sl st into the next st, ch6 return sl st, into the same st
from now on work into every st at the bottom and keep missing a st between ch loops at the top, until you get to ch6 return,
then its a gap st between loops at the top and the bottom again.
Follow the diagram the 'x' are the missed stitches the ch10 sl st, must go between the join of the original Octagons.


