Showing posts with label crochet borders. Show all posts

Monday, 20 April 2020

CoronaCal borders: EYE MOTIF AND SQUARE


Please read carefully there are options for the border depending on 
how you joined your blanket together and if you added half eye motifs

RIPPLE ENDS PATTERN:

This was given a week or so ago, just to do the ripple ends and then the half 
eye motifs if added would straighten the other two side of the blanket.

Some have used two half eyes and some have use one half eye motif each end.

I actually am not a lover of half motifs and decided to edge my blanket with 
no half motifs so there will be a selection of ways to finish your blanket

ORIGINAL RIPPLE END PATTERN
Having joined 10 'eye' motifs together in a side by side with long half motifs 
at each corner, the blanket now has a deep ripple edge on two sides.

IF YOU HAVEN'T DONE THE RIPPLE ENDS THEN SCROLL DOWN TO DO THE COMPLETE 5 ROUND BORDER PATTERN BELOW

CoronaCal Ripple ENDS Pattern
US terms
Aran 5mm hook DK 4mm Hook

NOTE: For me the 2 row join colours were cream then camel so the colours to make the ripple match the eye motif joins will be the same, camel first and 
then the cream so it matches the joining

ROW 1: Att. camel yarn in the first sp, ch2, counts as first dc, 3dc into same 
sp, 3dc in next 8sps, miss the next dip sp, 3dc in next 8sps, 3dc, ch3, 3dc in point, repeat to end and finish with 4dc in last sp of last half eye motif.

[9granny shells on each up and down of ripple.]

ROW 2: Att. cream, and repeat row 1.

COMPLETE BLANKET EDGING

[Side by side eye motif blanket]

If you added the 2 rows of the ripple border and are now adding the border 
to the straight sides. You will need 2 rows of granny shells adding to the 
straight sides as you have done to the ripple ends.
WORKING ACROSS THE STRAIGHT ENDS WITH THE HALF MOTIFS.

ROW 1: Att. yarn and work granny shells of 4dc in first sp, 
AND ALL SIDE SPS, EXCEPT the 7th row and the 3rd row after the spears, 
ON THE HLAF EYES. Granny shells into each sp of the middle 6 sps, of the full eye motif and then granny shell in same 13 side sps, OF A HALF EYE to end, finish with 4dc in last sp.
NOTE: The number of granny shells for the length of the straight edge of the half motifs is 13 granny shells of 3dc, 
[13 from centre to edge, 25 for the whole length of a half eye]
ROW 2: Att. next col, in sp between the 1st and second dc ch2, counts as first dc 3dc into same sp, granny shell of 3dc in each sp, to end, 4dc in last sp.
ROW 3: Att. yarn in any corner, this row will go all the way around the blanket, remember to do 3dc, ch3, 3dc at corners and points on ripple sides and miss 
the dips, so the blanket lies flat. sl st, to complete.
deep ripple side

if you left off the half eyes there will be a shallow ripple too

ROW 4: Double 'v' st [2dc, 2ch, 2dc]. Att yarn in any corner, 2dc, ch3 2dc, 
in all 4 corner sps, 2dc, ch2, 2dc in every side sp, miss all dips, so the blanket lies flat. repeat and sl st to complete.
ROW 5: Att. yarn in sp, before the corner to point, with a sc, 6sc in the corner ch3 sp, sc in next sp between'v' sts, 5sc in all side ch2 sps, of each 'v'. sl st to complete.
ROW 6: Working into the BACK of the st ONLY, sc in each st missing one st in each dip. that means miss the sc st, between 'v' sts, sl st to complete.
DOING THE BORDER TO A COMPLETE D BLANKET.
ROW 1: Granny shells in every sp, miss dips and do 3dc ch3 3dc in corners 
and points.
ROW 2: repeat row 1
ROW 3: Double 'v' st [2dc, 2ch, 2dc]. Att yarn in any corner, 2dc, ch3 2dc, 
in all 4 corner sps, 2dc, ch2, 2dc in every side sp, miss all dips, so the blanket lies flat. repeat and sl st to complete.
ROW 4:Att. yarn in sp, before the corner to point, with a sc, 6sc in the corner ch3 sp, sc in next sp between'v' sts, 5sc in all side ch2 sps, of each 'v'. sl st to complete.
ROW 5: Working into the BACK of the st ONLY, sc in each st missing one st in each dip. that means miss the sc st, between 'v' sts, sl st to complete.
Join my Facebook group for this pattern and to share you blankets so far.

CORONACAL SQUARE BORDER

After joining your selected number of 12" squares together i've made mine 
of 9 square and it will measure around 4' after blocking.

SQUARE BORDER PATTERN


ROUND 1: Att.yarn, LIGHT COL. i any corner sp, ch2 counts as first dc, 2dc ch3, 3dc, miss 3 sts, 3dc in next st, miss 2 sts 3dc in next st, repeat the 
granny shell in every 3rd st, and 3dc, ch3, 3dc, in each corner, to end
[12 granny shells per square], sl st to complete.

ROUND 2: DARK COL. repeat round 1: Granny shells
ROUND 3: LIGHT COL. repeat round , granny shells.
ROUND 4- 9: DARK COL. dc in every st, 2dc, ch3 2dc in corner sps, sl st to complete.
ROUND 10: Att. LIGHT COL. yarn in any corner, 3dc, ch3, 3dc in corner sp,
miss 3sts, 3dc in next sp, miss 2sts, 3dc in next st repeatmiss 2sts 3dc in 
next st to end, with 3dc, ch3, 3dc in corner sps, sl st to complete.
ROUND 11: Att. DARK COL. Repeat round 10.
ROUND 12: Att. LIGHT COL. Repeat round 10


Tuesday, 11 September 2018

PATTERN: NEAPOLITAN RIPPLE BABY BLANKET


also details for a double/single bed ripple throw.
 The basic stitch count for this simple ripple to make what ever size blanket/throw that you want to make


multi coloured ripple too...

Friday, 8 September 2017

CHUNKY MONKEY CAL COMPLETE PATTERN: IN ONE POST


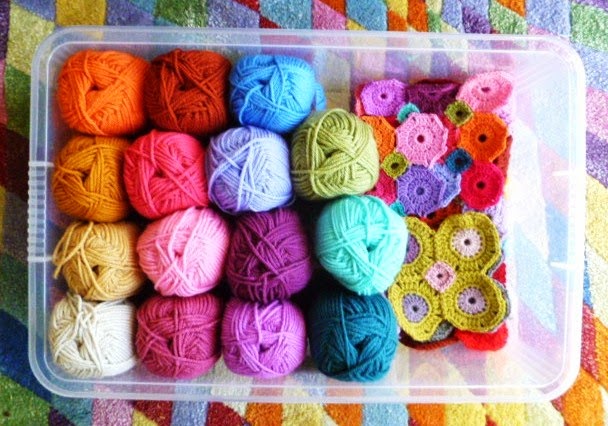
Now all neatly stashed into its own box ready for a week or two of wondeful crochet
 

One of these fabulous colours will have to go but which?
We needed to have 14 Stylecraft Chunky colours......can you spot the colour I have taken away?

Decided on a 3 round octagon in 14 colours with dozens of colour combinations to follow in stages?  
sample of some of the throw octagons below
14 colour, Three round Octagon Pattern
And 

The 14 colour simpler pattern below will also be available. 

Something for everyone


This cal is going to be all about OCTAGONS, fill-ins and lots of colour. 


The pattern with detailed pictures will be added to this site soon.
Use the motif to make the throw or just a cushion if that's all you can manage, but there will be something for everyone I hope.


Links to other octagon patterns will also be available during the length of this
 Octagan Chunky Monkey Throw Crochet Along.

We will be using a Stylecraft Special Chunky in 14 colours and you will need a 6mm hook


To access the octagon patterns on the side bar just click on the picture it is linked to the pattern.
All the patterns on this site are my own and free for you to use, give as presents or even sell but all I ask is you credit me for the design please.

ALL PARTS OF THIS PATTERN ARE NOW IN THIS POST
Thank You and have fun


Stage 1 of Pattern1:The 3 colour Octagon 


PATTERN 2: Simple one colour Octagon

You will need 14 colours of Chunky or 2 strands of dk.
 6 mm hook
US terms

NOTE: I always weave in ends and crochet over them as I go, so I never ever have ends to deal with when a project is finished. 
It just takes a few seconds to deal with all the ends as you work a piece and saves the extra hours at the end dealing with them.
If there are any teeny tiny tips of ends showing you just nip them off to tidy up no waste now ends and the piece is finished once the crochet is finished
PATTERN 1: 3 COLOUR OCTAGON
Make a one finger wrap of 3 wraps, or you can ch5, but the finger wrap saves on yarn, has no end, and looks neater.
Round 1: ch2(counts as first dc), 15dc into wrap, sl st to complete. (16dc)
For Stage 1: make 7 circle in all 14 colours, plus 2 extra 1 in Lavender and 1 in Spice
making a total of 100 circles
Stage 2: will be posted in about 3weeks time...if you are quick and finish maybe you cold have a goo at one of the alternative pattern on the site
Or 
You could use lots of left overs in a multitude of colours anf join together in a random selection and have a go at....
PATTERN 2

SIMPLE OCTAGON PATTERN

Make a one finger wrap of three wraps, or ch5 sl st, into a circle.

Round 1: ch2 (counts as first dc), 15dc into circle wrap, sl st to complete. (16dc)


Round 2: ch2 (counts as first dc), 1dc into same st,*1dc, ch2,1dc, into next st, 2dc into next st, repeat from * to end, 
finish with 1dc, ch2, 1dc in the last st, sl st, to complete. (8sides, 8 corners)

How easy was that?

JOIN AS YOU GO
Join all the octagons together at corners only
Make 100 OCTAGONS For a throw measuring approximately 43" square 
109cms
Weight:each motif weighs approximately 6g
Measures: 3.5" (9cms)
This pattern can be made in almost any yarn but will vary in size.
Each motif measures:
Chunky: 4.25" (11cm)
DK: 2.5" ( 6.5cm)
DK Cotton: just under 2.5" (6cm)
If you use the DK or Cotton it will be smaller. 

IF MAKING THE SIMPLE VERSION THEN IT COULD EASILY BE MADE BIGGER.
STAGE 2: ROUND 2 
US Terms in Black, UK Terms in red
You should now have ready the 100 x 16dc, (16tr, UK Terms) circles.
7 circle in every colour plus two extra circle one in Spice and one in Lavender
 Divide your circles into two groups makes it easier to work round 2

Round 2: Change colour, attach yarn in any st, 2sc, (2dc, UK Terms) into each st,

sl st to complete, cut and weave in end. (32sc) (32dc)


FOLLOW COLOURS below:

GROUP 1 x 7 colours

1st round in CAMEL: add a second round in
1 lavender
2 meadow
3 fondant
4 raspberry
5 pomegranate
6 spice
7 gold

1st round in FONDANT: add a second round in
1 spice
2 gold
3 camel
4 copper
5 raspberry
6 pomegranate
7 aspen

1st round in SPICE: add a second round in
1 aster
2 camel
3 pomegranate
4 raspberry
5 copper
6 fondant
7 magenta
8 gold

 1st round in POMEGRANATE:add a second round in
1 spice
2 plum
3 fondant
4 raspberry
5 copper
6 camel
7 gold

1st round in RASPBERRY: add a second round in
1 magenta
2 fondant
3 pomegranate
4 spice
5 copper
6 gold
7 camel

1st round GOLD: add second round in
1 plum
2 fondant
3 raspberry
4 spice
5 copper
6 camel
7 pomegranate

1st round COPPER: add a second round in
1 teal
2 fondant
3 pomegranate
4 raspberry
5 spice
6 gold
7 camel

GROUP 2 x 7 colours


1st round in LAVENDER: add a second round in
1 raspberry
2 magenta
3 aspen
4 meadow
5/6 teal x 2
7/8 aster x 2

1st round in MAGENTA: add a second round in
1 spice
2 raspberry
3 teal
4 aspen
5 meadow
6/7 lavender x 2

1st round in TEAL: add second round in 
1 gold
2 copper
3 magenta
4 lavender
5 aspen
6 aster
7 meadow

1st round in ASPEN: add a second round in
1 meadow
2 aster
3 meadow
4 teal
5 magenta
6 fondant
7 camel

1st round in ASTER: add a second round in
1 meadow
2 lavender
3 magenta
4 plum
5 gold
6/7 aspen x 2

1st round in PLUM: add a second round in
1 aster
2 meadow
3 aspen
4 lavender
5 magenta
6 pomegranante
7 fondant

1st round in MEADOW: add a second round in
1 camel
2 aspen
3 teal
4 aster
5 lavender
6 magenta
7 pomegranante

It took me bout 2 minutes to do round 2 which was twice what it took for round 1 so allow yourself a few minute per motif, so this round will take a little longer to do than the first but i wont post stage 3 which will be the joining round 3 and a colour chart to follow so you will be able to see how they will come together.


STAGE 3: THIRD ROUND AND JOINING ROUND

Round 3: change colour, ch2 counts as first dc, (UK Terms first tr


1dc (1tr) in next 3 sts, 


 ch3, 1dc (1tr) into next 4sts,


  repeat to end 


 finish with ch3. sl st to complete


NOTE: This is the join as you go round.


Join as you go....Complete the first row of octagonn motifs JOINING EACH OCTAGON THE THE NEXT
Following the colour chart BELOW. 
In the second row match corners 


JOIN BY...ch1, ch1 through the matching corner, ch1, then complete the next side


The Octagons are joined making small square holes that we will fill in, in Stage 4


already starting to look like a throw


COLOUR CHART TO COPY AND PASTE AND PRINT 
10 Rows of 10 Otagons
Make the first row of 10 JOINING AT SIDE IN A LONG ROW
Listing of colours writen as you look at the throw, but joining as with all crochet is worked from right to left.


PICTURE ABOVE IS THE SAME AS THE CHART BELOW


SO SORRY A MISTAKE IN ROW 1 6th FROM THE RIGHT IT SHOULD BE
COPPER SPICE RASPBERRY


COLOUR CHART FOR CHUNKY MONKEY CAL


3 ROUND OCTAGON: First listed colour is the middle circle 


LEFT SIDE                                          as you look at the Throw                    RIGHT SIDE


Plum

Pom

Aspen

Rasp

Mag

Spice 

Spice

Pom

Plum 

Gold

Rasp

Camel 

Plum

Spice

rasp

Pom

Fond

Gold

Rasp

Copper

Pom 

Spice

Copper

Gold 

Pom

Camel

Spice 

Camel

Pom

Fond 

Fond

Aspen

Laven 

Camel

Mead

Pom 

Plum

Fond

Gold 

Copper

Camel

Pom 

Fond

Gold

spice

Spice

Rasp

copper

Copper

Gold

Fond 

Fond

Camel

Rasp 

Spice

Camel

Pom 

Gold

Fond

Copper 

Aster

Plum

Mead 

Teal

Gold

Magen 

Spice

Aster

Copper 

Magen 

Rasp

Fond 

Gold

Pom

Camel 

Pom

Copper

Rasp 

Spice

Fond

Camel 

Camel

Gold

spice

Fond

Pom

Gold 

Pom

Gold

Camel 

Aspen

Magen

Teal 

Mead

Laven

Aster 

Pom

Plum

Aspen 

Mead

Camel

Laven 

Spice

Gold

Rasp

Copper

Fond

Gold 

Rasp

Spice

Pom 

Copper

Pom

Fond 

Gold

Spice

Copper

Rasp

Fond

Pom 

Laven

Teal

Aster 

Aster

Mead

Laven 

Teal

Magen

Plum 

Plum

Aster

Mead 

Camel

Laven

Magen 

Pom

Spice

Copper 

Camel

Rasp

spice

Copper

Rasp

Gold 

Pom

Rasp

Camel 

Gold

Copper

Rasp 

Mead

Magen

Aspen 

Magen

Aspen

Teal 

Aspen

Aster

Magen 

Aster

Aspen

Teal 

Aspen

Mead

Aster 

Magen

Laven

Pom 

Spice

Magen

Camel 

Gold

Camel

Rasp 

Camel

Spice

Fond 

Rasp

Pom

Spice 

Teal

Laven

Magen 

Laven

Aster

Mead 

Teal

Mead

Aster 

Mead

Teal

Aspen 

Plum

Magen

Laven 

Aspen

Fond

Teal 

Fond

Rasp

Mead 

Cam

Fond

Pom 

Rasp

Camel

Copper 

Fond

Spice

Pom 

Magen

Teal

Laven 

Aster

Laven

Aspen 

Magen

Laven

Plum 

Laven

Aspen

Magen 

Aspen

Teal

Mead 

Laven

Magen 

Aster

Aster

Gold

Plum 

Copper

Teal

Laven 

Magen

Spice

Gold 

Rasp

Gold

Camel 


Teal

Aster

Plum 

Aspen

Mead

Magen 

Teal

Aspen

Laven 

Aster

Magen

Teal 

Magen

Mead

Plum 

Aster

Aspen

Laven 

Mead

Aster

Aspen 

Aspen

Camel

Magen 

Gold

Plum

Fond 

Fond

Copper

Spice 

Plum

Aspen

Teal 

Laven

Teal

Aster

Plum

Laven

Mead 

Laven

Mead

Aspen 

Mead

Aspen

Aster 

Laven

Aster

Magen 

Plum

Mead

Teal 

Teal

Copper

Plum 

Laven

Rasp

Teal 

Mead

Pom

Camel 


STAGE 4 chunky Monkey
 FILL-IN SQUARES US Terms in Black UK Terms in Red


Round 1:
One finger wrap of three wraps, or ch 4, sl st, into a circle.
 ch2 (counts as first dc/tr),


3dc/3tr, into circle, ch1
 , sl st, into a corner sp, ch1,


 4dc/4tr, ch1, sl st, into second corner sp, ch1,

  repeat for 3rd and... 
4th corner
  sl st into first st, to complete. 
Follow the chart for colours.
Throw should be as picture below: 
the first octagon on left in colours: Plum, Pomegranate, aspen
as below


9 squares x 9 rows of mini fill-in squares.
ROW 1:Copper, aster, aspen, teal, meadow, plum, magenta, lavender, aster.

ROW2:Spice, camel,meadow, plum, aster, lavender, teal, aspen, lavender.

ROW 3:Pomegranate, raspberry, teal, magenta, meadow, aspen, magenta, teal, magenta.

ROW 4:Fondant, camel, gold, aspen, plum, lavender, aspen, lavender, plum.

ROW 5:Raspberry, spice, raspberry, camel, fondant, plum, meadow, aster, meadow.

ROW6:Camel, copper, pomegranate, copper, camel, aspen, magenta, plum, teal.

ROW7:Gold, fondant, gold, pomegranate, raspberry, gold, teal, meadow, aspen.

ROW8:Copper, pomegranate, fondant, copper, spice, camel, raspberry, camel, aster.

ROW 9:Spice, copper, gold, camel, raspberry, fondant, pomegranate, spice, lavender.


HAVE FUN...the last stage 5 to see the completed throw in about two weeks time.

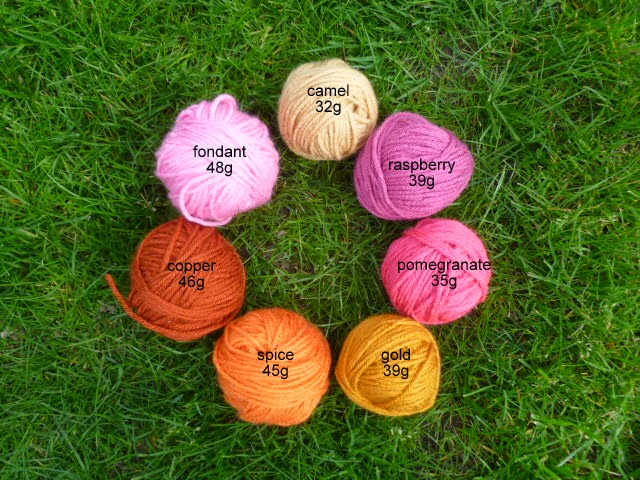
 I still need to weigh the cooler blue green purple shade, but there is approx. these amounts left to do the border so we will have plenty for an exciting border.


Just a border picture to share for now I will add the completed pattern for the border and more pictures tomorrow
The yarns used Stylecraft Chunky in 14 colours as below......and a 6mm hook used
And I'm adding a few giant flowers too


After the fiasco of this afternoon I'm not taking any chances with this attempt at the final post so a completely new post that automatically saves it's self.
WELL IT DIDNT QUITE WORK OUT THAT WAY DID IT?

But I now think the post is complete
UK TERMS IN RED


These giant flowers are based on the back of the Fair Isle cushion from a couple of years back and can be made and added for extra decoration to the CHUNKY MONKEY THROW.

The pattern for the Flowers and the cushion for the next cal will be added next week
but you can find the original pattern here without the changes....

5mm Hook, USA terms

finger wrap of 4 wraps, or Ch5, sl st, into a circle


Round 1: 12dc, into circle sl st to complete the round.
crochet over the end as you go.


Round 2: 2SC in each st, sl st to complete

ROUND 3: A clusters of  4tr in  2sts, with 2 chain between each, sl st to complete round


TREBLE CLUSTERS: 
2yarn over's and 2 pull throughs holding th stitches on the hook until you have done 3 then last pull though is through all 3 or 4 stitches to make the cluster then a ch to hold the cluster together

Notes to help:
so technically you are doing 3ch, between but 1ch, holds the cluster together and 2ch, gives the spacing
use sl sts, to move to the next starting space when working in one colour

Round 4: sl st to chain space,  4dc,  in each chain space. sl st to complete round


Round 5: 1dc in each of the next 4 stitch, then ch3, repeat in each of the 12 sections,
sl st to complete the round


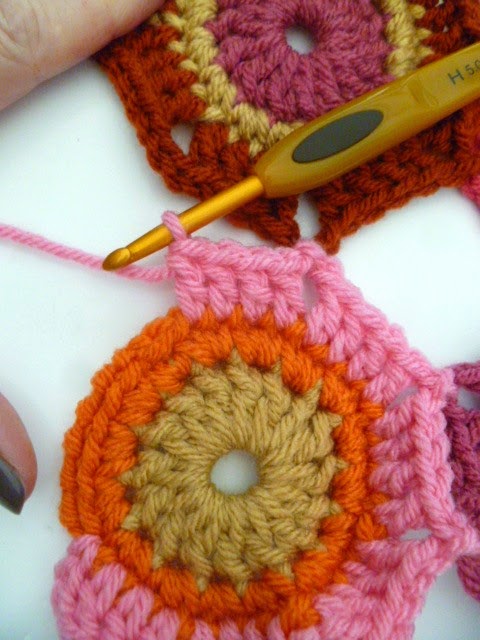
Round 6: sl st, to middle of the 4dc of round 4 (as picture below), 

then do 4dc, ch3, 4dc, in the chain loop anchor with a sl st in the centre of the next 4dc of round 4, repeat until round completed


lots of these flowers can be joined together to make another blanket


The Border of the chunky Monkey
A narrow border of 7 colours, one half in the pinks, oranges and yellows on the blue, green and purple half....and a 7 colour border of the blue, green and purple on the pink orange and yellow side.
In a sequence of
1: fondant
2: raspberry
3: pomegranate
4: spice
5: copper
6: gold
7: camel

And.....
1: plum
2: magenta
3: lavender
4: aster
5: aspen
6: teal
7: meadow 

COLOUR CHANGE
Making a colour change halfway round on the third corner.
Start on the motif that has a centre of plum, and ring of pomegranate and an outer 
octagon of aspen.


Round 1: attach the first colour (fondant) in the 3rd St on the corner


Sc, (dc), in next st,

 CORNERS: sc, (dc), in ch spch2, sc (dc) in the same sp, sc (dc)

sc, (dc) in the next 4sts and the ch sp, ch6,


 sc (dc) in the next ch sp, 

sc (dc) in the next 4st, sc (dc) in the next ch sp 

continue to do 6sc, (6dc), 6ch in the sp,  until you reach the next corner, 1sc, ch2, 1sc, (1dc,ch2,1dc), in the ch sp, 1sc,(dc) in the next 4 sts, 1sc, ch2, 1sc, (1dc,ch2,1dc) in the next ch sp, continue with the 6sc, 6ch, (6dc, 6ch) until you reach the third corner change colour on this corner.

CHANGING COLOUR
On the third sc (dc), half make the sc, (dc), attach the colour change and pull through the last st, continue using the new colour

 sc, ch2, sc (dc, ch2, dc) in the corner sp, continue with the pattern of 6sc, 6ch, (6dc 6ch) to complete the round, join to the first st.
 ROUNDS 2-7:
Repeat round 1 with an increase in 2sts on each side.


BELOW: start and finish point of each round

ENJOY THE CHUNKY MONKEY