Pattern all pulled together in one post for the Secret Garden Blanket pattern......


US Terms [UK Terms in red brackets]


JOIN AS YOU GO
Use a sl st at the end of each st to join to the motif before
INFILLS


These Amelia Flower or Amelia Box motif can be joined together to create another design...maybe a scarf or wrap...
as was the original design


CENTRE MOTIF PATTERN:
Change colour each round using chart. It always helps to see what it should look like before you start I think.


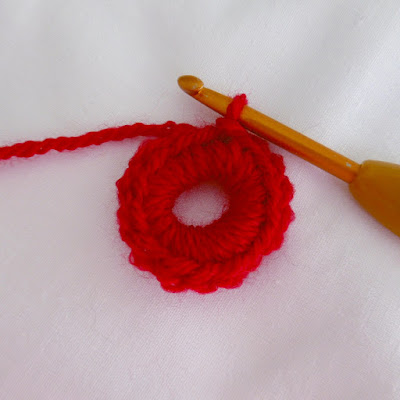
NOTES: Make a finger wrap of 10 wraps, simply wrap the yarn around your finger 10 times and slide off holding firmly this is an old Irish technique to add padding to Irish crochet....and one of my favourite centre starts
US Terms [UK Terms in red brackets]

ROUND 1: 16sc [16dc], into the circle, then repeat a second row of 16sc [16dc], over the top of the first, sl st, to complete, cut and weave in ends. [32sc (32dc)]
NOTES: If you are struggling to make this centre neat and cover the first row of stitches it might help to do 14sc [14dc], on the first round and then cover them with 16sc [16dc], and don't pull the stitches too tight, a bit like doing a spike or long stitch, a little practise should give you a satisfying result


ROUND 2: ch2, counts as first dc [tr], 2dc [2tr], into each st, sl st to complete, cut and weave in ends [32dc (32tr)]
NOTES: This round is pretty straightforward, a mention here about THE DREADED ENDS...Please learn to weave them in using your hook or sew them in as you go, it really will make you feel so much better when you complete the blanket and there are NO ENDS TO SEW OFF!

ROUND 3:
NOTES: 5tr [5dtr], Popcorn st. This is my method of doing a Popcorn stitch, I have seen it written up as a LAZY METHOD...the cheek! I never could see the point in removing your hook from the stitches and reinserting them to do this stitch in the traditional method, when turning the work was easier.
Att yarn in any sp between a pair of dc [tr], of round 2. Ch3 [counts as first tr (dtr)], 5tr [5dtr], into first sp,

turn motif over and sl st into the back of the first tr [dtr], ch3,


return to front of motif, 5tr [5dtr], into next sp, turn to back and sl st into the ch3, turn back to front and repeat in each sp, to end, sl st into first st, cut and weave in ends.


A Round 3 Popcorn Flower finished...great for decorative pins or broaches
ROUND 4: Att. yarn in any ch3 sp, sc [dc], ch3, sc [dc], into same sp, 3dc [3tr], ch3, 3dc [3tr], into next sp, sc [dc], ch3, sc [dc], into next sp, repeat alternate sts into point, loop, combination to end, sl st to complete, cut and weave in ends. [8small loops, 8 points]
NOTE: Attaching the yarn will create the fist dc, always a hard one this when writing patterns, the chain stitches that are needed to start a round. Do you assume people will understand this or write it into the pattern on every round?
I always use the attachment as a sc [dc], ch2 at a dc [tr], and ch3 as a tr [dtr], and so on....

NOTE: At round 5 you could join together to make another option for another blanket!
And use a solid square infill...lots of options

ROUND 5: Att. yarn in ch3 point, sc [dc], ch3, sc [dc], in same point, 3tr [3dtr], ch3, 3tr [3dtr], in next ch3 loop, repeat to end, sl st to complete, cut and weave in ends. [8small loops, 8 points]


PASTELS TO ROUND 5
ROUND 6: Att. yarn in any POINT, ch5, sc [dc], in next LOOP, ch5, sc [dc], in next POINT, repeat to end, sl st into first ch5 loop, continue in same col. [16 loops]


NOTE: At this point it might be a little tight, it will flatten as you add the next couple of rounds, so don't worry, always a tricky one when designing a motif, chain stitches can be a little tighter than needed, but adding the cover stitches always seems to stretch them out and make the round grow.


CLOSE UP OF ROUND 6
NOTE: At this point it might be a little tight, it will flatten as you add the next couple of rounds, so don't worry, always a tricky one when designing a motif, chain stitches can be a little tighter than needed, but adding the cover stitches always seems to stretch them out and make the round grow.
ROUND 7: ch2, [counts as first dc (tr)], 5dc [5tr], in first ch5 loop, 5dc [5tr], in next ch5 loop, ch3, 5dc [5tr] in next ch5 sp, 5dc [5tr], in next ch sp, ch3, repeat to end ch2, sl st to complete, cut and weave in ends. [10dc [10tr], each side]


NOTE:basically here you are tuning the decorative centre into a traditional Octagon.

CLOSE UP OF ROUND 7
ROUND 8: Att. yarn in a ch2 sp, ch2 counts as first dc [tr], dc [tr], ch2, dc [tr], in first ch3 sp, 1dc [1tr], in next 10sts, dc [tr], ch2, dc [tr], in next ch2 sp, repeat to end, sl st to complete, cut and weave in ends. [12dc [12tr], each side]
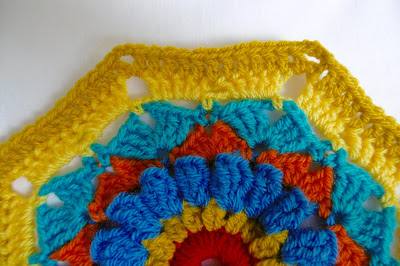

CLOSE UP OF ROUND 8
ROUND 9: Att. yarn in a ch2 sp, ch2 counts as first dc [tr], dc [tr], ch2 dc [tr], in first ch2 sp, 1dc [1tr], in next 12sts, dc [tr], ch2, dc [tr], in next ch2 sp, repeat to end sl st to complete, cut and weave in ends. (14dc [14tr] each side]


CLOSE UP OF ROUND 9
ROUND 10: Att. yarn in any ch2 sp, ch2 counts as first dc [tr], dc [tr], ch2, dc [tr], in first, ch2 sp, 1dc [1tr], in next 14sts, dc [tr], ch2, dc [tr], in next ch2 sp, repeat to end, sl st to complete, cut and weave in ends. [16dc [16tr] each side]


Please feel free to create you own colour ways, i've seen some beautiful and stunning colour combinations for this Secret Garden pattern..have fun
SHADES OF BLUE SECRET GARDEN

JOIN AS YOU GO
Use a sl st at the end of each st to join to the motif before
INFILLS

Make 12 part 1 patterns to round 10.
JOIN AS YOU GO ON ROUND 10 side by side in 4 rows of 3 motifs


BORDER PATTERN
NOTE: Add the border before you add the edging infills
Round 1: sc [dc], in every st, sc [dc], ch2, sc [dc], in each corner sp, and ch 24 between octagons, sl st to complete round.
Round 2: dc, [tr], in every st, dc [tr], ch2, dc [tr], in every corner, sl st to complete round.
Round 3: Moss stitch rounds from round 3. Start in any corner, sc [dc], ch2, sc [dc], in corner sp, ch1, miss a st, sc [dc] in next st, ch1, miss a st, repeat to next corner, sc [dc], ch2, sc [dc] in every corner sp....repeat to end sl st to complete.


Round 4: start in a corner sc [dc], ch2 sc [dc], ch1, sc [dc], in next ch1 sp, repeat corners and moss st to end, sl st to complete round.
Round 5+: Repeat round 4, add as many rows of moss stitch as you like.
NOTE: Moss stitch can pull up slightly tighter so if your tension is tight then use a bigger hook.
This is a very versatile stitch and by just changing the colour you can create some interesting patterns
TRIANGLULAR 'HOLES' AT THE EDGES
THE SECOND FILL IN WILL BE RELEASED IN NOVEMBER AFTER THE SECOND WORKSHOP
and will be free for all to use on the Secret blanket x
THE ORIGINAL AMELIA FLOWER PATTERN has been adapted These Amelia Flower or Amelia Box motif can be joined together to create another design...maybe a scarf or wrap...
as was the original design
Add the fill in to the 6 'holes' left by joining the 12 centres.

THE IN FILL PATTERNS X 2

UK Terms in red
YARN: Special DK/Batik dk
4mm hook
CHANGE COLOUR FOR EACH ROUND
light colour first, darker shade second, finish with a green shade to join to the 'hole'


INTERNAL IN FILL MOTIF PATTERN
First colour, 1finger wrap of 4 or 5 wraps or ch4, sl st, into a circle.
Round 1: Basically a first round granny square but with 4dc [4tr], on each side cont. in first colour, ch2 counts as first dc [tr], 3dc [3tr], ch 3 4dc [4tr], repeat 2 more times, sl st, to complete round. (16dc [16tr]

Round 2: Att. new colour, in the first sp between any first 2, dc [tr], with a sc [dc], sc [dc], in the next 2 sp, sc [dc], into the ch3 sp, ch5, 2tr, [2dtr], into same sp, ch5 sc [dc], into same sp, repeat for all 4 sides.

Round 3: attach new colour in the 3rd sc [dc], of the 5sc [5dc],

ch3, 5dc [5tr] into the first ch5 loop, ch3
sc [dc] between the 2tr [2dtr] ch3, 5dc [5tr] into the second ch5 loop, ch3,
sc [dc] into the 3rd sc, [dc] of the row below, repeat 3 more times, sl st, to complete round.
ROUND 3 WILL BE THE JOIN AS YOU GO ROUND
Joining the motif to the holes created when you join the centre PART 1 of the carousel
together
Join to the 'hole' in the 3st, down from the corner
Use a sl st into the 3rd st down, after the 5dc [5tr], before you do the ch3 at the top of the petal, and again after the ch3 and before the 5dc [5tr] of the second side of the petal in the 3rd ch st, down from the corner for each petal.

SECOND EDGE INFILL TRIANGLE PATTERN

Use a sl st into the 3rd st down, after the 5dc [5tr], before you do the ch3 at the top of the petal, and again after the ch3 and before the 5dc [5tr] of the second side of the petal in the 3rd ch st, down from the corner for each petal.

SECOND EDGE INFILL TRIANGLE PATTERN

A Simple chai st infil for the outer triangles.....I tried lots of variations, but wasn't happy with any of them until this one, hope you love it as much as me.
THIS IS NOT A CHART
 Just a diagram to help work the stitch count out. There are more sts at the bottom to the top so some become spaces and some are worked one after the other
The 'X' are the missed stitches and the numbers are the chain stitches up and then down again.
PATTERN
25sts across the bottom of the triangle...mark the centre st. helps here.
16 sts each side at the top
Att. yarn to the 3rd st from the corner, ch3, sl st, into the second st from the corner at the top, ch3 return, sc [dc], into the same st,
sc [dc], into the next st, a space, sc [dc], in the next st,
ch4 miss a st at the top sl st into the next st, ch4 return, sl st into the same st,
sc [dc]into the next st, sc [dc], into the next st,
ch5, miss a st, at the top sl st into the next st, ch5 return sl st into the same st,
sc [dc] into he next st, sc [dc] into the next st, ch6, miss a st, at the top, sl st into the next st, ch6 return sl st, into the same st
from now on work into every st at the bottom and keep missing a st between ch loops at the top, until you get to ch6 return,
then its a gap st between loops at the top and the bottom again.
Follow the diagram the 'x' are the missed stitches the ch10 sl st, must go between the join of the original Octagons.
 COLOUR: I used one of the colours of the Octagons but you could use a different colour if you wished


THIS IS NOT A CHART

The 'X' are the missed stitches and the numbers are the chain stitches up and then down again.
PATTERN
25sts across the bottom of the triangle...mark the centre st. helps here.
16 sts each side at the top
Att. yarn to the 3rd st from the corner, ch3, sl st, into the second st from the corner at the top, ch3 return, sc [dc], into the same st,
sc [dc], into the next st, a space, sc [dc], in the next st,
ch4 miss a st at the top sl st into the next st, ch4 return, sl st into the same st,
sc [dc]into the next st, sc [dc], into the next st,
ch5, miss a st, at the top sl st into the next st, ch5 return sl st into the same st,
sc [dc] into he next st, sc [dc] into the next st, ch6, miss a st, at the top, sl st into the next st, ch6 return sl st, into the same st
from now on work into every st at the bottom and keep missing a st between ch loops at the top, until you get to ch6 return,
then its a gap st between loops at the top and the bottom again.
Follow the diagram the 'x' are the missed stitches the ch10 sl st, must go between the join of the original Octagons.


Sue This is just beautiful. You are truly an artist in crochet! Thank you for the beautiful pattern. Gail
ReplyDeleteHi Gracie, thank you and i hope you enjoy the pattern lots xxx
DeleteI totally agree with Glacier, it is absolutely stunning.
ReplyDeleteHi Daisy, thanks xx
DeleteSorry about that, I meant Gracie. My phone changes words.
ReplyDeletelol predictive txt again xx
DeleteSusan, do you sell yarn packs anywhere?
ReplyDeleteHi Sticks, me personally no but Lormear.co.uk have lots of my patterns with packs and Poppy's sell some and Black Sheep too xx
DeleteI just found your site yesterday & having been going thru your site since then! Just amazing, Susan. Everything was detailed enough for me to follow. (I have trouble with that at times! LOL) I'm a lefty so understanding is rough at times. I am copying many of your blankets to make for friends & family. Thanks so much! Great site!!
ReplyDelete