Cart wheel 'spoke' centre with the mini square infill to add to the 36 dc circles
Colours: Dark and moody
16 Block repeat
CARTWHEEL 'SPOKE' CIRCLE PATTERN
Finger wrap of 4 wraps
ROUND 1:12sc into wrap circle sl st, to complete [12sc]
ROUND 2: change col. 1dc, ch1, repeat in each st. sl st, to complete [12spokes]
ROUND 3: 1dc in every st, 2dc in ever sp, sly t to complete [36dc]
BLACK JOINING ROUND
JOINING THE 'SPOKE' CIRCLES TOGETHER USING THE SAME STITCH AS FOR THE SOLID CIRCLES
US Terms as always
Lay out your 9 x 3 round circle in the colour group so you know which one is next to each other
Att. joining yarn in any stitch, ch2 counts as first dc, 1dc in next 2 sts, ch3 1dc in next 3sts, ch3, repeat to end sl st to complete [ 12 X 3dc, 12 x ch3 loops]
join with a sl st replacement for the middle ch st, work from top down hook the yarn and pull through both the ch3 loop and the st to att. 2 squares together as picture below, join 2 loops together on each join
When the first circle is complete then join the next one to the first one using a replacement sl st for the 2nd ch st in the 3ch sts, as above.
Join 2 ch3 loops together on each side as below
Join the circles in 3 lines of 3 motifs
leaving one ch3 loop free between each join of 2, ch3 loop, on each square.
Make sure you do leave one ch3 loop free when joining them in rows of 3
you must leave one ch3 loop free on each side for the in fill squares as below picture
so that you have a square with 4 loops x 3ch, one on each side ready to join the infill squares in PART 7
join together with 2 loops on each side leaving one loop free between joins
MINI SQUARE INFILL PATTERN:
US Terms
Finger wrap of 4 wraps,
ROUND 1: ch2, counts as first dc, 2dc into circle, ch1 sl st into the first ch3 loop of the "hole' ch1, 3dc into finger wrap, ch1 sl st into the next ch3 loop on the second side of the "hole", repeat until the square has been joined to all the 4 sides of the 'hole' sl st to complete. [12dc, 8ch sts, 4 sl st.]
PICOT EDGING FOR A WRAP
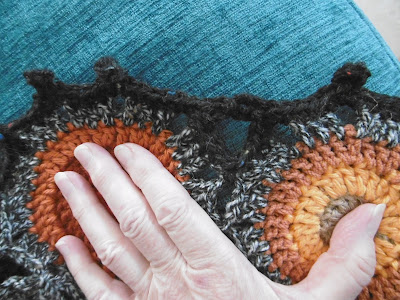
The edging stitch has ch5 picots at every ch3 sp, the first and the last picots are joined together to 'straighten' the sides a little.
pictures above and below is the joined ch5 picots that fill in the 'dip' and make for a straighter edging
PATTERN
US Terms
Aran weight yarn
5mm hook
Black yarn to finish
ROUND 1: Att yarn in the second ch3 sp on any corner, 2sc, ch5 picot, 2sc in same ch3 sp, sc in next 3 sts, 2sc, ch5 picot 2sc in next ch3 sp, repeat for the next 4 x ch3 sps,
sc in next 3sts, into dip, sc into centre join sp, sc, in next 3sts, of next octagon,
2sc into first ch3 sp, ch2, use the next ch st as a sl st into the last picot loop of the previous octagon ch2, complete the picot, s2sc into same ch3 sp, sc in next 3 sts, 2sc, ch5 picot 2sc in next ch3 sp. repeat to end
Always joining the last and the first picots together to form a triangular join between octagons and straightens the sides a little


Great idea for the Wagon Wheels Sue Pinner and as Ive had lots of doctors, opticians & hospital appointments this week, I think I shall add in some outer wheels & incorporate them into the throw. I think it will finish it off nicely. MANY THANKS FOR THE ADDITION INSPIRATION & SHARING YOUR WITH US. XX LINDA
ReplyDeleteHi Linda, you're welcome cant wait to se it xxx
DeleteMany thanks for reposting the infill pattern too. I can easily find this one on my tablet! Eurekka . .lol Xx Linda
ReplyDeleteYou're welcome xx
Delete