Thursday, 5 October 2017

2011 NOONOO GIANT FLOWER BLANKET

Noo noo our 1976 Camper Blanket from a 2011 pattern


needs a blanket for the bed and l did promise months ago to make one so my first bed cover is going to be for our beloved camper Noo noo...
this is the flower l am going to use, but still working on the colour choice
 simple solid center

I used a join as you go FOR JOINING THEM TOGETHER
I also used TWO DIFFERENT Round 2's for the Noo Noo blanket

12 PETAL FLOWER

FLOWER DETAILS...ORIGINAL BLANKET
6mm hook and two strands DK acrylic 

 FLOWER MEASURED: 8" diameter and l need to make it 40" wide x 54" 
long.

perfect to go over the seat when not up as a bed

Making 5 x 7 flower = 32 complete flowers.....a nice size to do
and l'm keeping the wavy edge
This is the camper so do l stay with the green and cream and a splash of orange or go for the rainbow of colour in the flags?...

first 7 made in reds and oranges
next round will be in the greens
loved it so far and Phil was pleased l was making NooNoo a blanket at last too!

PATTERN
Change colour every round or use a space dyed yarn with a shorter dye length
DK 4mm hook, makes a much smaller flower
Aran,  5mm hook
or
Chunky or 2 strands of DK, 6mm hook for the giant version

2 OPTIONS ON ROUND 2/3

NooNoo Flower Bed Blanket Pattern

a finger wrap of 4 wraps or ch5 els t to complete

Round 1:12dc [12tr], into circle els t to complete.
Round 2: Solid centre. 24dc [24tr], 2 in each st, els t to complete.
 (Round 2 option 2/3 :Spoke version. 12 dc [12tr], with a chain between each dc. 
Round 3: 3dc [3tr], in each ch sp)

Round 3: Solid centre. 36dc, [36tr], 2 in first st, 1 in the next repeat tot end, sl st to complete. 
Round 4: 2dc [2tr],  ch4, miss a st, 2dc [2tr], in next st, repeat 12 times, sl st to complete.


Round 5: Att, yarn between the 2 sets of 2dc [2tr], 8dc [8tr], into the ch4 loop, repeat for all loops, sl st to complete


Wednesday, 4 October 2017

BOBBLE STITCH BEADS


BUTTON BEAD PATTERN

US Terms in Balck UK Terms in red Brackets

One finger wrap of 15 wraps.

ROUND1:sc [dc], into the circle 12times, sl st to complete.


ROUND 2: 40+sc [40+dc], into the circle over the top of round 1
 continue until you have a dughnut for a button and continue to fill the hole for a Gem of a bead.

 NOTE: don't pull the stitches tight but not loose either
FLOWER AS ABOVE.

This flower has 9 petals so i finished with 18sc, but 16sc, is easier to achieve

To make the Flowers on the header picture
Finish with 16sc on the last round, sl st to complete, weave in end.

Add a round of 8 X 3tr, bobble stitches, sl st, between each bobble, 


RIPPLE/PLAIN SLIPPER PATTERNS: All in one post

RIPPLE SLIPPER/SOCKS
UPDATE:oops! this pattern was in UK TERMS...NOT GOOD its such an old pattern i was doing them in uk terms back in 2009 and using 3ch for a tr definitely needs updating xx
NOW UPDATED
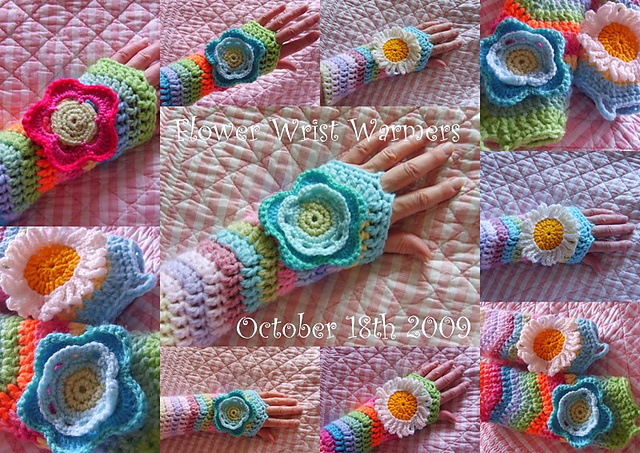
SLIPPER/ WRIST WARMER RIPPLE PATTERN:
Chunky or 2 strands of dk 6mm hook
Approx. 70g for a pair of socks 20 hows with a shell edge
You can make a pair on less than a day
NOW CORRECTED 
US TERMS
chunky or two strands of dk
6mm hook

ch24, sl st into circle, you need multiples of 12sts  ripple
NOTES: 4 base ch, for the first 4dc then one chain for the increase of 3dc in one st, then 4 chain for the next 4dc then
3ch for the decrease of 3 sts = 12 to make a ripple pattern. pattern repeat of 2 patterns for each row
ROW 1: [Ch2 counts as the 1st dc], 1dc in next 3ch, increase do 3dc, in next ch st, making a point, 1dc, in next 4ch, cluster the next 3sts tog, [half make a dc, in next 3sts, hold the loops on the hook, yo, pull through all of the loops to make a cluster and the side dip in ripple] repeat to complete the 1st row, sly t to complete
ROW 2- 14: change colour every row for strips or use self striping yarn,  repeat the 1st row until you've done as many rows as you need to fit your wrist or foot l did about 14 rows for the wrist warmer. 
Finish with a single crochet and a 6 chain loop at the front point to go over middle finger…This will keep the wrist warmer in place….looks quite Medieval too!!
 14 rows but a bigger hook for the slipper/sock for my size 4 shoe (6mm hook) and 16 rows and a bigger hook(7mm) again for OH slipper/socks at size 9 shoe
FINISH EDGE: Sew the one end together for socks, POINT AT CENTRE FRONT, and add a favourite shell stitch, frill or decorative stitch to the top of the sock.
Add your favourite flower decoration, this is one of my favourites on this bag, a leaf and circle flower embroidered onto project 

picture construction of 
RIPPLE SLIPPER OR WRIST WARMER


WRIST WARMERS TO GO WITH THE SOCKS IF ITS REALLY COLD


LADIES SLIPPER PATTERN


Make them as plain, or decorative as you want...stripes plain or with flowers


LADIES SLIPPER PATTERN
(USA Terms)
Chunky or Very chunky yarn and 5mm hook

Basic pattern, you may need to alter lengths depending on the yarn used and foot size
PATTERN: make 2
Ladies: size4/5
chain 4, into a circle
Row 1: 12 dc into circle, sl st to complete round (12sts)
Row 2: 2dc in each stitch, sl st to complete round (24sts)
Row 3: 1dc in each stitch plus one extra at the end of the round, sl st to complete round (25sts)
Row 4: 1dc in each st, sl st to complete round (25sts) 
Row 5- 11: Repeat row 4 (25sts)

NOTE: adjust the number for your foot, high or low front

BACK OF THE SLIPPER:
The back of the slipper is worked back and forth not in the round as are Rows 1-11
NOTE: Depending on yarn this could be less rows

Row 12-16 depending on foot size and yarn etc: 
1dc in the next 20 sts then turn and work back and forth until the correct amount of rows have been done to fit your foot snugly. 

TO FINISH:
Sew or sc the back seam together.
Add a SC stitch in a contrast yarn around the opening edge,
keeping it quite tight as after one wearing they stretch a bit.

DECORATION:

Make a flower or circle decoration, and sew it to the Slipper front.


HELPFUL TIPS:
For me 16 rows was perfect in one yarn in another I only needed 14 rows in total it just depends on the yarn you use.
And to get the right fit with one yarn I did the last row in SC and not DC.


Don't make it too loose or they won't stay on your feet as they stretch a little in the first wearing.
But it is easy to adjust the number of rows to fit your foot and make them personal.
Started to make another pair with a lower front and longer back....

so play around with the number of rows for the front and the back.


MEN'S  SLIPPER PATTERN


(USA Terms)
Chunky or Very chunky yarn and 5mm hook

Basic pattern, you may need to alter lengths depending on the yarn used and foot size

PATTERN: make 2
Gents: size 10
chain 4, into a circle
Row 1: 14 dc into circle, sl st to complete round (14 sts)
Row 2: 2dc in each stitch, sl st to complete round (28 sts)
Row 3: 1dc in each stitch, sl st to complete round (28 sts)
Row 4 - 11: repeat round 3 (28sts) 


NOTE: adjust the number for individual foot
I did 16 rows in total for my son who takes a size 8.

BACK OF THE SLIPPER:
The back of the slipper is worked back and forth not in the round as are Rows 4-11
NOTE: Depending on yarn this could be less rows

Row 12-18  depending on foot size and yarn etc: 
1dc in the next 23 sts then turn and work back and forth until the correct amount of rows have been done to fit your foot snugly. Some yarns it is 6 back of slipper rows and some it is 7.

FRONT TAB:
An additional tab front into the 5 sts left off when doing the backs at the front plus two more stitches one each end of the tab.
 So do 2 rows of 7dc, start in the last stitch of the side/back and finish in the first sts of the side/back so that both ends of the tab overlap the side/back by one stitch

TO FINISH:
Sew or sc the back seam together.
Add a SC stitch in a contrast yarn around the opening edge and tab front
keeping it quite tight at the back but not so tight over the tab.

DECORATION if you want:
Make a circle decoration, and sew it to the Slipper front.


HELPFUL TIPS:
The number of rows in the total  length can depend on the yarn you use.
And to get the right fit with one yarn I did the last row in SC and not DC for some yarns


Don't make it too loose or they won't stay on your feet as they stretch a little in the first wearing.
But it is easy to adjust the number of rows to fit your foot and make them personal.

Monday, 2 October 2017

BOBBLE PATTERNS IN ONE POST

HOW AN IDEA DEVELOPED...
from a Bobble Square to a hex and back to a Flower square again...


BOBBLE FLOWER GRANNY SQUARE PATTERN 2011

The bag of Flowers l found have been made into a colourful flowery cushion front 
border is 3 rows of SC, after joining with a row of the same sc in Lime green
With a red Bobble edging
Reminds me of a my Grannies vintage tea cosy hehe
 The Flowers are a simple flat Flower petals made with 2 chain 2Trebles 2 chain and a sl st into next stitch and repeat, but when you add the leaves and back ground they curl up a bit so maybe the Bobble flower is better?
Love the mix of Lime with the red bobbles
Makes a simple crochet version of the pompom edging you can get on cushions today

PICTORIAL PATTERN


BOBBLE FLOWER PATTERN 2011, updated
Aran 5mm hook [Bobbles] the flower will work with dk but doesn't pop quite the same as with Aran 
dk 4mm hook [all other]
US Terms

Chain 4 and sl st into a circle or make a finger wrap of 4 wraps
Round 1: 8sc into circle sl st to complete round
change colour

Round 2: USE ARAN FOR THE BOBBLES TO MAKE THEM POP. 
Att. flower col. in and st, in the same stitch do a cluster of 3tr:  ch2, half make 2tr, drawn last yo through all sts, to complete the bobble, sc, into next stitch and repeat another cluster of 3 trebles in the same st, 
sl st into first st, to complete. [8 bobble petals]

NOTE: make sure all bobbles pop to the front.

Makes a lovely flower pin decoration as it is if you stopped here or join several together for another project.

Round 3: Add leaves, att. a shade of green, into the sc, between any bobble, ch2, 2dc, repeat 3dc, in each space
it now looks like a flower in a circle. [24dc]

Round 4: Att. back ground col. in one of the spaces, ch2, 2dc, in same sp, ch2, 3dc,  first corner, 3sc in next side sp, repeat until you have 4corners and 4 sides sl st. to complete. [9sts each side]

Make 9 or 12 for a cushion front, add then to a larger central granny square or make lots and lots for a blanket, Round 5: join as you go with a round of sc, 1sc in each st and sc, ch3 sc, in corners.


BOBBLE EDGING TO CUSHION
Add a bobble edging to a cushion  every other stitch with a sc in the in-between sts, and 2 bobbles at the corners.

BOBBLE CIRCLE BLANKET 
ORIGINALLY A BATH MAT PATTERN from 2011 
click for camping pictures of me making it, its still being used today 


Finger wrap of 5 wraps
ROUND 1: ch4 [counts as tr], tr in next st, repeat for every st, sl st to complete. [16tr]
oops! amended round no ch sts should have looked at the bath mat earlier sorry 
ROUND 2: USE ARAN FOR THE BOBBLES TO MAKE THEM POP. But dk will work
Att. cream col. in any st, in the same stitch do a cluster of 3tr:  ch2, half make 2tr, drawn last yo through all sts, to complete the bobble, sc, into next stitch and repeat another cluster of 
3tr in the same st, sl st,  to complete. [16 bobbles]

ROUND 3: Att. back ground yarn in any st, this round makes the bobble circle into a square.
ch2 [counts as first dc], 2dc in same st, sc in next 7sts, 3dc in next st, repeat for all sides, 
sl st, to complete. [40sts in round]

ROUND 4: Cont. in same background colour, dc in every st, with 1dc, ch3, 1dc, in the middle dc at each corner, sl st, to complete. [11dc each side]

ROUND 5: JOIN AS YOU GO ROUND.
1hdc, ch3, 1hdc, in corners and 1hdc in each of the 11side sts.  [13hdc each side]

when all square are joined together add the 
Bobble edging stitch to complete