Showing posts with label wrist warmers. Show all posts

Sunday, 2 December 2018

DAY 2: CROCHET WIP'S ADVENT CALENDAR

Same stitch as yesterday but a pair of Wrist Warmers


WRIST WARMERS
US Terms
5mm hook
2 strands of dk
Make 2

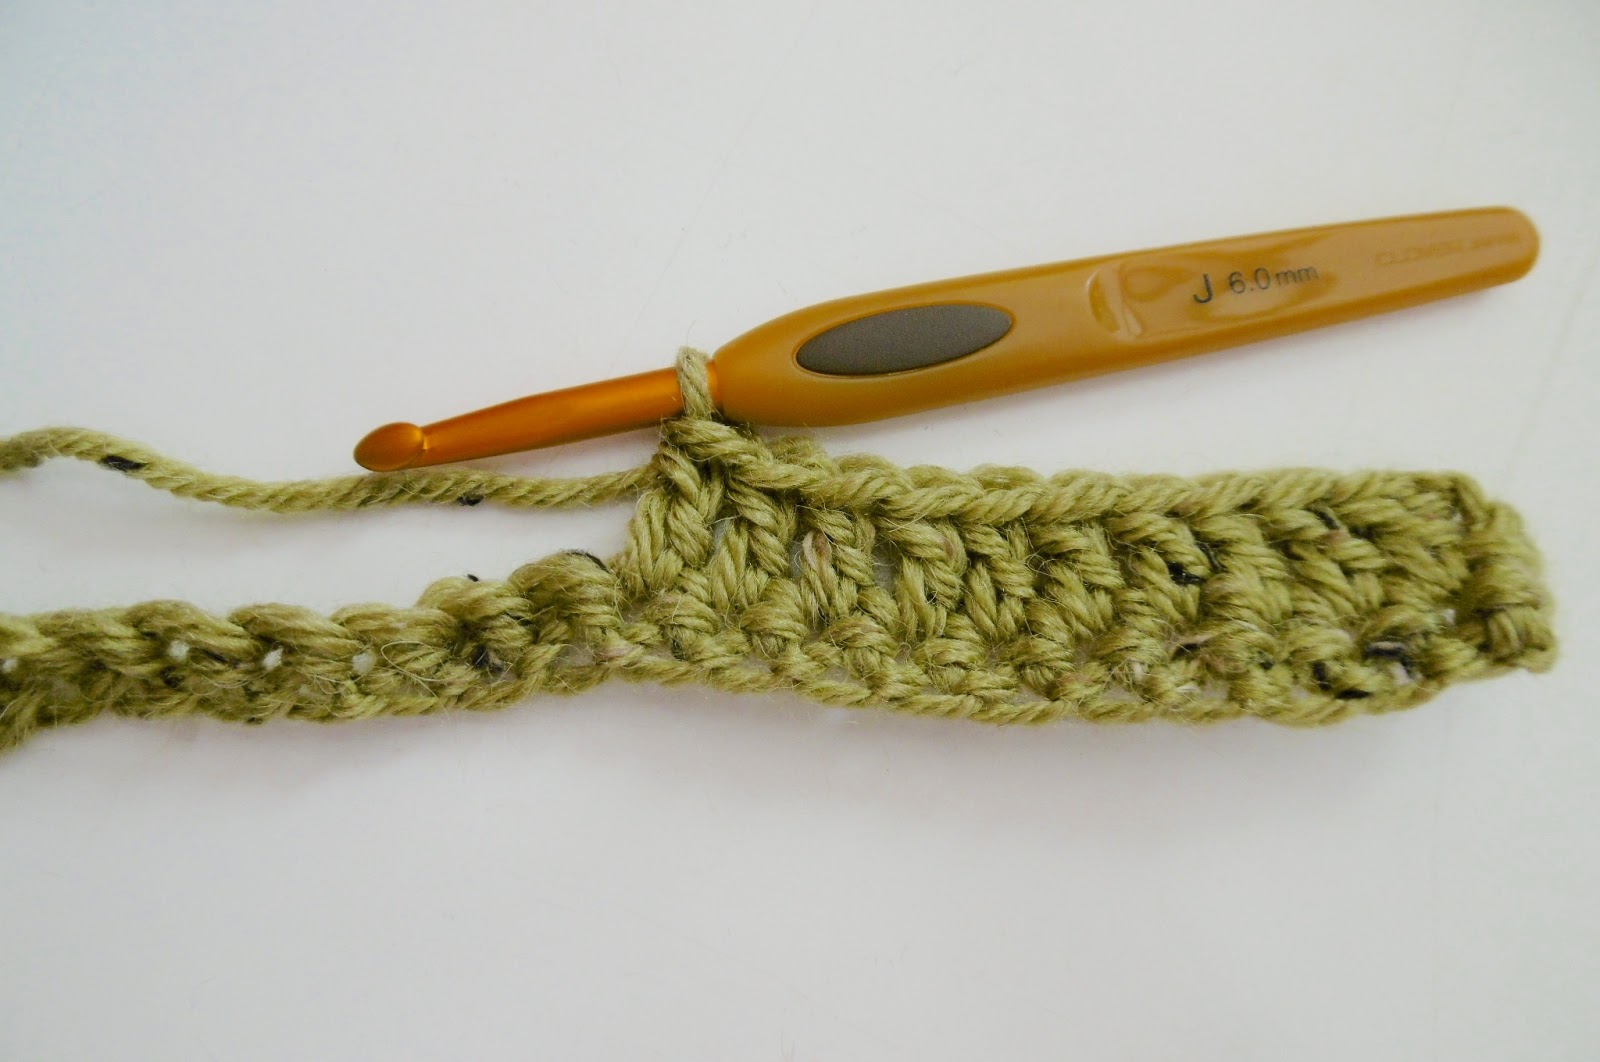
ELASTIC BASE CHAIN PATTERN
Want to eliminate the dreaded base chain?

Do you struggle with the fiddle of working into a base chain? 

Hate the tightness of the first row of your blanket? 

Base chains that twist? 

Eliminate chain stitches that aren't always easy to see.

Make the very first row of your wrist warmers or any blanket easy and fun.

I Know I was very happy to learn this stitch many years ago, hope you will find base chains fun to do from now on


Make a simple ch/sc base that will have elasticity, eliminate the dreaded and sometimes tight base chain that is always a fiddle to work into.

Not worked from left to right but at the end, when complete it is used in exactly the same as a base chain.

HOW TOO:

sl st on hook

ch2,

 insert hook into 2nd ch from hook, 


yo, pull back through, 2 loops on hook 


yo, pull through first st only, [basically make a ch st]

yo pull through both sts on hook
first st complete


repeat: 

insert hook into the last st, made.

yo, pull back though st, 2 loops on hook,


yo pull through first st only, [basically made a ch st]


yo pull through both sts on hook


2nd st complete


repeat until you have the length required.

turn and continue with the next st.


No tight base chain, an easy second row
now a fun stitch to do.....

It turns the often, tight base chain, that makes the next row of crochet a fiddle to do into an easy time saving base stitch, 

especially if you are making blankets with a 200 or 300 base chain.

It can also be used as a cord.

WRIST WARMER PATTERN:
Base chain: 25sts. Use the above elastic base chain pattern to start your wrist warmers 

ROW 1: ch2 counts as first dc, 10dc, miss a st, 3dc, ch2, 3dc, in next st, miss a st, 11dc, turn. [25sts]

ROW 2-9: Repeat row one, turn [23sts]

ROW 10: Repeat row 1, with a Decrease of one st, each end.turn each after each row [23sts]

ROW 11- 14: Repeat. turning after each row. [23sts]
 
ROW 15: Repeat with a decrease of 1st, each end. [21sts]

ROW 16 & 17: Repeat, pull yarn through last st, leave long end to sew tog. into a tube

Make 2, if you have longer arms then make them a row or two longer 


Friday, 28 September 2018

PONCHO WITH SLEEVES PATTERN LINK


This started life as a normal poncho and could be just that using the start of the pattern but i turned it 90deg, and added wrist warmer sleeves..wore it to death, still hanging in the wardrobe but not worn it for a couple of years now.


Wednesday, 4 October 2017

RIPPLE/PLAIN SLIPPER PATTERNS: All in one post

RIPPLE SLIPPER/SOCKS
UPDATE:oops! this pattern was in UK TERMS...NOT GOOD its such an old pattern i was doing them in uk terms back in 2009 and using 3ch for a tr definitely needs updating xx
NOW UPDATED
SLIPPER/ WRIST WARMER RIPPLE PATTERN:
Chunky or 2 strands of dk 6mm hook
Approx. 70g for a pair of socks 20 hows with a shell edge
You can make a pair on less than a day
NOW CORRECTED 
US TERMS
chunky or two strands of dk
6mm hook

ch24, sl st into circle, you need multiples of 12sts  ripple
NOTES: 4 base ch, for the first 4dc then one chain for the increase of 3dc in one st, then 4 chain for the next 4dc then
3ch for the decrease of 3 sts = 12 to make a ripple pattern. pattern repeat of 2 patterns for each row
ROW 1: [Ch2 counts as the 1st dc], 1dc in next 3ch, increase do 3dc, in next ch st, making a point, 1dc, in next 4ch, cluster the next 3sts tog, [half make a dc, in next 3sts, hold the loops on the hook, yo, pull through all of the loops to make a cluster and the side dip in ripple] repeat to complete the 1st row, sly t to complete
ROW 2- 14: change colour every row for strips or use self striping yarn,  repeat the 1st row until you've done as many rows as you need to fit your wrist or foot l did about 14 rows for the wrist warmer. 
Finish with a single crochet and a 6 chain loop at the front point to go over middle finger…This will keep the wrist warmer in place….looks quite Medieval too!!
 14 rows but a bigger hook for the slipper/sock for my size 4 shoe (6mm hook) and 16 rows and a bigger hook(7mm) again for OH slipper/socks at size 9 shoe
FINISH EDGE: Sew the one end together for socks, POINT AT CENTRE FRONT, and add a favourite shell stitch, frill or decorative stitch to the top of the sock.
Add your favourite flower decoration, this is one of my favourites on this bag, a leaf and circle flower embroidered onto project 

picture construction of 
RIPPLE SLIPPER OR WRIST WARMER


WRIST WARMERS TO GO WITH THE SOCKS IF ITS REALLY COLD


LADIES SLIPPER PATTERN


Make them as plain, or decorative as you want...stripes plain or with flowers


LADIES SLIPPER PATTERN
(USA Terms)
Chunky or Very chunky yarn and 5mm hook

Basic pattern, you may need to alter lengths depending on the yarn used and foot size
PATTERN: make 2
Ladies: size4/5
chain 4, into a circle
Row 1: 12 dc into circle, sl st to complete round (12sts)
Row 2: 2dc in each stitch, sl st to complete round (24sts)
Row 3: 1dc in each stitch plus one extra at the end of the round, sl st to complete round (25sts)
Row 4: 1dc in each st, sl st to complete round (25sts) 
Row 5- 11: Repeat row 4 (25sts)

NOTE: adjust the number for your foot, high or low front

BACK OF THE SLIPPER:
The back of the slipper is worked back and forth not in the round as are Rows 1-11
NOTE: Depending on yarn this could be less rows

Row 12-16 depending on foot size and yarn etc: 
1dc in the next 20 sts then turn and work back and forth until the correct amount of rows have been done to fit your foot snugly. 

TO FINISH:
Sew or sc the back seam together.
Add a SC stitch in a contrast yarn around the opening edge,
keeping it quite tight as after one wearing they stretch a bit.

DECORATION:

Make a flower or circle decoration, and sew it to the Slipper front.


HELPFUL TIPS:
For me 16 rows was perfect in one yarn in another I only needed 14 rows in total it just depends on the yarn you use.
And to get the right fit with one yarn I did the last row in SC and not DC.


Don't make it too loose or they won't stay on your feet as they stretch a little in the first wearing.
But it is easy to adjust the number of rows to fit your foot and make them personal.
Started to make another pair with a lower front and longer back....

so play around with the number of rows for the front and the back.


MEN'S  SLIPPER PATTERN


(USA Terms)
Chunky or Very chunky yarn and 5mm hook

Basic pattern, you may need to alter lengths depending on the yarn used and foot size

PATTERN: make 2
Gents: size 10
chain 4, into a circle
Row 1: 14 dc into circle, sl st to complete round (14 sts)
Row 2: 2dc in each stitch, sl st to complete round (28 sts)
Row 3: 1dc in each stitch, sl st to complete round (28 sts)
Row 4 - 11: repeat round 3 (28sts) 


NOTE: adjust the number for individual foot
I did 16 rows in total for my son who takes a size 8.

BACK OF THE SLIPPER:
The back of the slipper is worked back and forth not in the round as are Rows 4-11
NOTE: Depending on yarn this could be less rows

Row 12-18  depending on foot size and yarn etc: 
1dc in the next 23 sts then turn and work back and forth until the correct amount of rows have been done to fit your foot snugly. Some yarns it is 6 back of slipper rows and some it is 7.

FRONT TAB:
An additional tab front into the 5 sts left off when doing the backs at the front plus two more stitches one each end of the tab.
 So do 2 rows of 7dc, start in the last stitch of the side/back and finish in the first sts of the side/back so that both ends of the tab overlap the side/back by one stitch

TO FINISH:
Sew or sc the back seam together.
Add a SC stitch in a contrast yarn around the opening edge and tab front
keeping it quite tight at the back but not so tight over the tab.

DECORATION if you want:
Make a circle decoration, and sew it to the Slipper front.


HELPFUL TIPS:
The number of rows in the total  length can depend on the yarn you use.
And to get the right fit with one yarn I did the last row in SC and not DC for some yarns


Don't make it too loose or they won't stay on your feet as they stretch a little in the first wearing.
But it is easy to adjust the number of rows to fit your foot and make them personal.

Monday, 16 November 2009

IT GREW OVER NIGHT!!

Had a load of small granny squares...mmmm need to be re made in the heavier weight but l like the idea

Why does a 'use up yarn' project turn in to a l've got to 'buy more yarn' to finish it off project? hehe
loving it's yummy colour and will be a warm welcome into the hallway!

Monday, 19 October 2009

THINKING FLOWERY SLIPPERS TODAY...

Phil is digging up the bathroom floor today...trying to stop the shower in the kitchen!!! fingers crossed it works this time was so pleased with the bathroom at 1st now l hate it...boo hoo!!

More thoughts on the flowery wrist warmers....and thanks for message Lucy you were the inspiration...thanks great minds an all hehehe x..........

Really want to make a jacket with long wrist warmer sleeves but slippers will be quicker and as l've already got a rippling big blanket on the go all ready......not so sure l should ever start BIG projects l loose interest so fast and move on the new fields...hehehe

SMALL IS BEST ME THINKS!!

Managed to finish my swap 12 granny squares to post today...not so sure they will get there though b***** stikes!! ggggggrrrrrr

Sunday, 18 October 2009

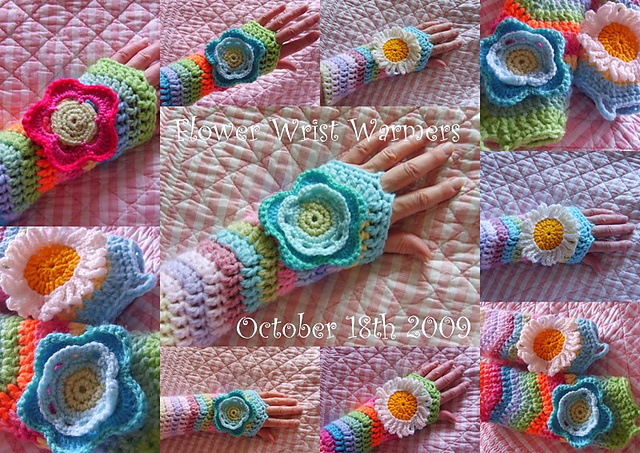
LEFT OVER FLOWERS

Got carried away with the left over flowers this morning added a few to the wrist warmers...bit of fun now got to make more to make a pair!!

RIPPLE WRIST WARMERS

Great way to use up all those teeny weeny balls of yarn you have left over


Made a couple of pairs of wrist warmers after taking my daily dose of Inspirational Attic24
Had thought the simple ripple pattern l was using would be a real easy pattern to convert to a wrist warmer....liked the point over the hand and palm...just added a loop to the point to go over the middle finger so the glove stays in place quick to make too

SIMPLE PATTERN:
24 CHAIN….4 TREBLE INCREASE OF 3 TREBLE IN NEXT STITCH
THEN 4 TREBLE AND A DECREASE OF 3 TREBLE IN NEXT 3 STITCHES (RETAIN THE HALF TREBLE AND PULL YARN THOUGH ALL 4 LOOPS ON THE HOOK TOGETHER)
THEN REPEAT AGAIN…..24STITCHES ALL TOGETHER

I used Double strand DK or chunky on a 6mm hook the last 4 rows done with a 5.5mm hook (HAND AREA)

FINISH with a single crochet and a 6 chain loop at the front point to go over middle finger…keeps the glove in place….looks quite Medieval too!

Wednesday, 17 September 2008

PONCHO WITH SLEEVES PATTERN


BASIC PONCHO PATTERN

To fit an Adult  21-22" 54-57cm Head size...72sts

If it needs to be bigger add multiples of 8sts, don't make it too tight, you can always fill in a neck line with a few extra rounds or an additional cowl, but you can't take sts out.

NOTE: The yarn is acrylic and i found over time it stretched a little so on looking back don't make it to big either!


Not the best pictures but it gives you an idea of what it looks like on
I have used James C Brett Marble and a 6mm hook


Ch 72, sl st into a circle don't twist it.

ROUND 1: ch2 as first dc, dc in first 2sts, miss a st, ch1, do 1dc in next 3 sts, miss a sts ch1, 1dc in the next 3 sts. repeat to end. [18 granny shells]
Looks a bit like a small ladder

ROUND 2: sl st in each st to the next space, 3dc ch2, 3dc in the frst space ch 1 then 3dc, ch1, in the next 8 spaces, then 3dc, 2ch, 3dc in the 10th space then 3dc, ch1 in the next 8 spaces, sl st to finish.
basically a granny square with 2 corners and a hole in the middle.

ROUND 3: to the number of rounds you want : REPEAT a granny shell in each space, with a ch1 space, and 2granny shells, ch2 between for the points.
This would be your basic granny poncho.

MY VERSION...turned 90deg and wrist warmers added...
I started by adding in some rows of single dc, one in each st then back to granny shells
I am not a lover of 'v' necks on me so I turned it around so the pointed bits were on my shoulders and I had a boat neck wide across the shoulders....nothing more than turning it 90degrees no pattern changes at this point

I kept going until I had 24 rows completed.
ROWS1-5 GRANNY SHELLS
ROWS 6-9 SINGLE DC
ROWS 10-14 GRANNY SHELLS
ROWS 15-21 SINGLE DC
ROWS 22- 24 GRANNY SHELLS
THEN THE WRIST WARMERS WERE ADDED
 to the pointed bits.


ROW 1: counting the point as number one, count 6 spaces from the point each side and add a marker.
this MARKER is the space you will stop and start in for the wrist warmers and the main body of the poncho.
 DO NOT REMOVE MARKERS UNTIL THE SLEEVES AND THE BODY ARE FINISHED
 Starting at the first marked space, do a granny shell in that space and one in the next 4 spaces, (5granny shells)

do one granny shell, ch3, 1granny shell in the point,

then a granny shell in the next 5 spaces, up to the space with the next marker in,

now the fiddly bit.
Bring the two markers side by side and sl st into the first granny shell of the wrist warmer making a complete circle,
ROW 2: TO THE LENGTH REQUIRED
Sl st to the next space and repeat ROW1. (12 granny shells in each row.)

I did 12 rows to fit me but crochet as many rows as you feel you need. This made a length I felt was comfortable to the wrist with a deep pointed turn back cuff.
repeat on the other point for the second wrist warmer.
THE BODY
ROWS 25-29 GRANNY SHELLS
ROWS 30-44 SINGLE DC
Back to finish the body of the poncho
Start at the marker and finishing at the marker, work back and forth with the remaining 29 spaces 
(29 spaces for the back, 29 spaces for the front). 
Working the back and the front separately and do as many rows as you need to make it a length you require.
I made mine another 20 rows longer.
In total the body of the poncho from neck to hem is 44 rows long...but I am short so you may need to add a few more rows.
sew up the side seams of the body to finish.


I have to say laid out it does look like a very wide jumper and a slightly strange shape, but on.....
it falls well and feels comfortable and snugly

I might add a cowl to it as it gets colder or I might just make one that slips over the head and sits as if it is attached.

UPDATE: I wore it to death and loved it, got lots of compliments when i did wear it, its still hanging in the wardrobe but over the years its stretched so the sleeves are now a little longer than they were lol. Not worn it for ages, but cant part with it 

FOUND A COUPLE OF PAPER DOLLS......


Based on drawings l used 20yrs ago when l was designing kids fashions....made with a die cut heart to hide a littl message...and hand drawn and cut outs...memories of a past life