Showing posts with label granny shell. Show all posts

Tuesday, 19 November 2019

Corner to Corner Granny Shell Blanket.


Believe it or not in all the years of crochet i've never made a corner to corner Granny shell blanket before Its a pattern that gives a lovely crisp square edge......Love that.


In my version, i've used a ch3 to start and tr, to finish but all granny shells are 3dc and i work into the spaces to start and finish.


Simple pattern Corner to corner Granny Shell blanket


Im using Hayfield Spirit and a 4mm hook for this sample. But it could be made with Aran of chunky weight yarns

US Terms

CH4
ROW 1: 3dc and 1tr, into 4th ch from hook. ch3, turn
ROW 2: 3dc, into first sp, 3dc, 1tr, into last sp. ch3 turn
ROW 3: 3dc into first sp, 3dc into next sp, 3dc,1tr, into last sp, ch3 turn
ROW 4+: REPEAT ROW 3, with 3dc into all middle sps.
Make the width of the blanket as big as you require.

TO MAKE THE SQUARED CORNER
ROW 1: Ch3, miss first sp, 3dc in all sps to end, finish with 3dc, 1tr in last sp. ch3 turn.
ROW2: 3dc in first sp, 3dc in every space to end, 1tr, into last ch3 sp, ch3, turn
ROW 3: CONTINUE UNTIL ITS AS LONG AS YOU REQUIRE.

REDUCING THE RECTANGLE OR SQUARE
Start with ch3 only [no granny shell in first sp] finish with 1tr, [no granny shell in last sp]
 start with ch3 only to decrease

finish with tr only into last sp to decrease


Add a number of granny shells as a border to decorate, leave as it is or add a contrast stitch.

FOR MY FIRST EXPERIMENT
I am making a 30 row square for the centre....then a border and then more of the corner to corner granny triangles then another border....but it might change so watch out for updates.


make several squares and join in a more exciting pattern if you get bored with doing one giant blanket 


Thursday, 11 July 2019

4th Adult Hex Jacket

Loving these cosy Hex Cardies especially the granny shell version.
The plain colour solid granny i started is a bit boring to make, love the yarn but struggling to keep working on it for long periods so i've started the 4th version in  
James C Brett Marble dk, in the white/grey colour way


SLIMMER SLEEVE 
US Terms
For this version i'm doing a different stitch reduction for the sleeve section.
The usual basic pattern is 3dc [granny shell], ch1, for all 6 sides 
I am using 3dc, ch1 for 5 sides and 3dc, ch3, 3dc in corners, 

but for the sleeve section, I'm using 2dc, in each space and no chain with the corners of 3dc ch3, 2dc, the 2dc is on the sleeve section, 

this reduces the width of the sleeve section when folded into the 'L' shape for half the cardy. These stitches are mostly under the arm so its hardly noticeable that its a smaller stitch 
I'm also using a double sided version for this one, by turning every row so it will be reversible too.
Approx. 20 rows, join on the sleeve top seam, adding the back section before joining the 2 identical pieces together.
finishing with a few border rows and sleeve edging stitch of hdc.

BEFORE FOLDING INTO AN 'L' SHAPE


FOLDED INTO AN 'L' SHAPE 

100g is doing almost 14 rows. 


First version i tried with a slimmer sleeve


with links to the original designer 
Elizabeth Zimmermann

Thursday, 13 September 2018

Wednesday, 20 July 2011

BASIC GRANNY SQUARE PATTERN

Thanks everyone, thanks Blogger and Thank goodness for CROCHET...l'm all sorted now
GIANT GRANNY BLANKET
Made 2018 for my New Grandson 

Hardanger blanket a combination of granny squares 


USING COLOUR IN A GRANNY
Can make for some very exciting blankets...even in just 2 colours. 


BASIC 4 ROUND GRANNY SQUARE EACH ROUND A NEW COLOUR
US Terms,

dc, is ch2 to start, 
4mm hook for dc
5mm hook for Aran, 
6mm hook for chunky or 2 strands of dc
Sets of 3dc are called Granny Shells.

NOTES: Up to about 4 rounds working on one side of the granny square is OK, if making a larger granny then it is best worked alternate sides, turning and working both ways on a large granny square will stop any misshaped square and keep it a square. 


Finger wrap of 5 wraps or ch4 and sl st into a circle.
ROUND 1:  cont.in same col. ch2 counts as first dc, 2dc, ch3, 3dc, ch3, 3dc, ch3, 3dc, ch3, sl st, to complete.
[3dc, each side, ch3 corners]

ROUND 2: Att. new col. in a corner sp, ch2, [counts as first dc], 2dc, ch3, 3dc, in corner sp, repeat in each corner sl st to complete.
[6dc, each side, ch3 corners]

ROUND 3: Att. new colour, ch2,] counts as first dc] 2dc, ch3, 3dc,  3dc in side sp, repeat for each corner and side, sl st to complete. 
[9dc, ch3 corners]

ROUND 4: Att. new colour, ch2[counts as first dc]
2dc, ch3, 3dc in the corner sp, 3dc in each side sp, repeat for each corner and side, sl st to complete. [12dc each side, ch3 corners]


Tuesday, 18 March 2008

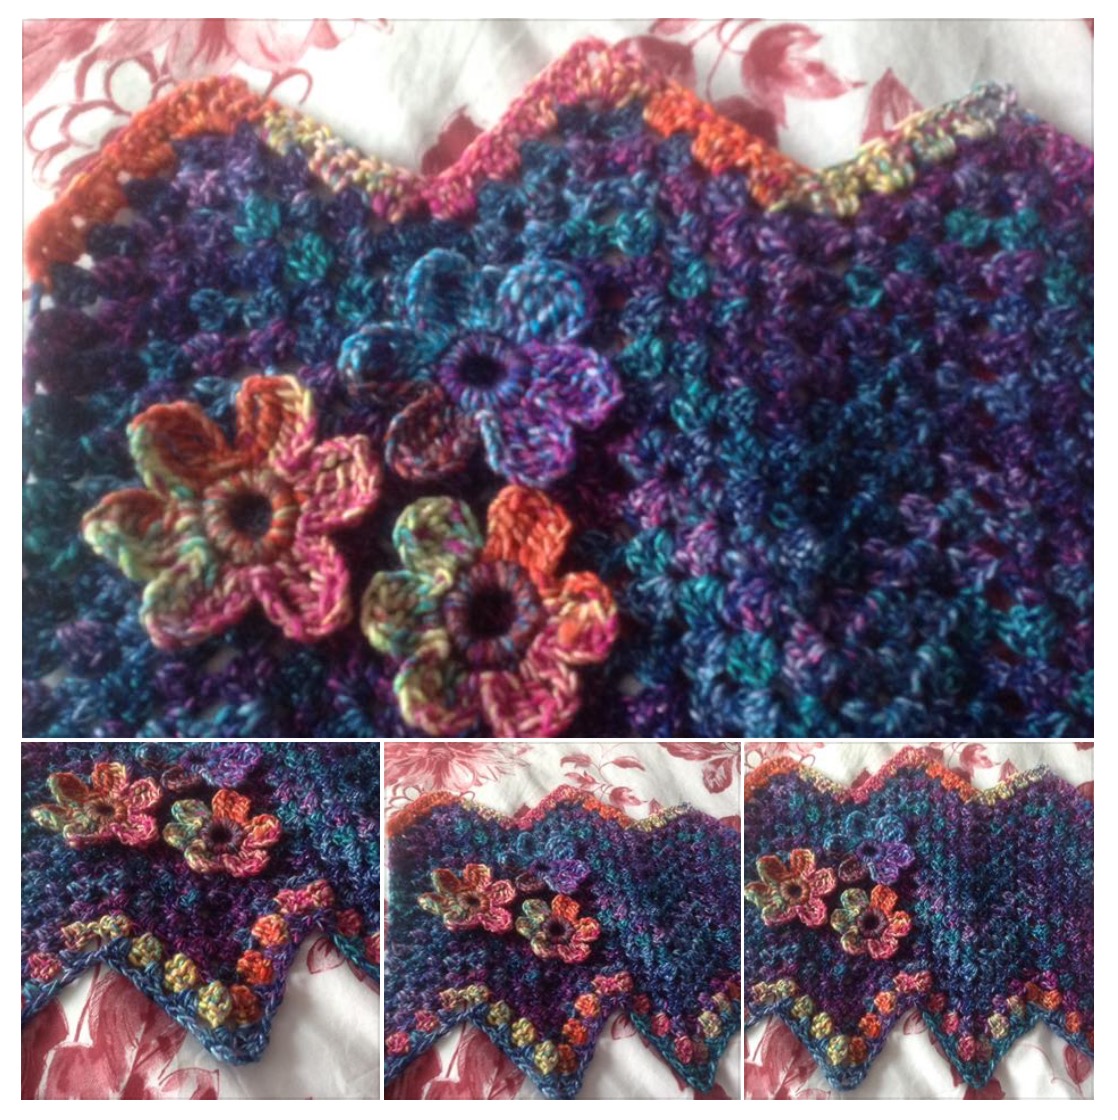
PATTERN: GRANNY RIPPLE DOUBLE COWL

I decided I loved the sample piece so much it was worth starting again with the ripples running length ways and making a 9 ripple double cowl 

US Terms in black UK Terms in brackets 

sample that decided the 9 Ripple cowl...

An 8 granny shell Ripple repeat pattern, using a 6mm hook.

This shawl sample is an experiment in yarn use with the granny ripple pattern...some yarns don't show the ripple so easily but by adding a second colour way at the edge, give enough detail so the pattern appears...


This sample: 
Just 3 x 8granny shell, repeat pattern, gives a shawl/or generous scarf width of 17"  the length 18rows is approx. 17" so far

HOW THE DESIGN PROGRESSED..
This pattern could be worked the other way round by doing a very much longer chain and the ripples down the length of the piece so the ripple edges run down the long sides.

I needed 9 ripples @ 23sts = 207 base ch. 
6mm hook and any chunky yarn
US and UK terms
Marble chunky has a huge selection of blended yarn colours
No extra stitches required, as I am going to work this long cowl in the round, it will be big enough to hang low on warmer days 
but it is long enough to twist a second time around my neck for the chillier moments of next winter.


4 Complete rounds of 9 ripples weigh approx. 66g 
with a couple of flowers the 
total weight approx. 350/360g


PATTERN:
ch 207 sl st into a circle

ROUND 1: ch2 counts as first dc, 2dc [2tr] into same st, ch3, 3dc [3tr] into same st, (first point) 
picture below

miss 2 sts, 3dc [3tr] into next st, repeat twice more, 
miss 3sts,(bottom of ripple)  picture below


3dc [3tr]into next st, miss 2sts, 3dc [3tr] into next st, miss 2sts, 3dc [3tr] into the next st, miss 2 sts, 3dc, [3tr] ch3, 3dc [3tr] into next st, start of the next ripple repeat the full ripple of 8granny shells to the end, sl st to complete. (9 full ripples)


Granny Tip: st, mark each dip as you reach it...makes it easier on a long run of ripples to keep track, remove before adding the final finish round 18


Round 2- 15: sl st into the next sp, 3dc, ch3, 3dc into top points, 3dc (granny shell) into side spaces, and miss the bottom space to create the decrease and the up turn
top point above


miss bottom space above.

Round 16: change colour and repeat round 2.


Round 17: change back to main col. repeat round 2.
 I like the two finishes so have done one dotty on one edge and on contrast granny shell round on the second edge

To Finish: 
Round18: add a round of granny shells in the second colour to the spaces of the start ch, to complete the second edge of the long cowl.


FLOWER PATTERN
A 2 finger wrap of 6 wraps.
  Round 1: 12sc [12dc] into the circle


Round 2: ch3, counts as first tr, [dtr) 1tr [1dtr] into the same st, 1tr [1dtr] into the next st, ch3, sl st into the same st, sl st into the next st, repeat for all 6 petals, sl st to complete.

FINISH
add a pin the back of each flower add to cowl.

fold the cowl in half so you see both edgings and stay warm.