Monday, 30 January 2017

SPINNING TOP BLANKET: FINAL UP DATE ON COLOURS

This will be the final update on colours until next week, giving you all some time to get to the stage of joining the motifs you have made up to round 9 and plus the diamond shaped infills.


SPINNING TOP BLANKET
MADE FROM THE CUSHION CAL PATTERN 
Make 4 or 9 Motifs
approx. 16" each

Stylecraft Aran and Alpaca tweed dk
5mm hook

Can be made in DK, but would be smaller 

Basically you will have 5 that finish with one of the blue/green shades and 4 that finish with the yellow/red shade placed like this


COLOURS SEQUENCE FOR 9 MOTIFS TO ROUND 9

1: pistachio, sage, cloud blue, storm blue, pistachio, camel, raspberry, spice, pomegranate.
2: sage, pistachio, parchment, denim, camel, spice, duck egg, ROSE, gold.
3: duck egg, denim, pistachio, gold, saffron, sage, spice, rose, raspberry.
4: denim, parchment, rose, raspberry, spice, saffron, storm blue, cloud blue, pistachio.
5: rose, pomegranate, spice, pistachio, sage, sea breeze, camel, duck egg, denim.
6: pomegranate, rose, gold, sage, cloud blue, denim, saffron, pistachio, sage.
7: spice, saffron, duck egg, parchment, rose, raspberry, pomegranate, storm blue, sea breeze.
8: saffron, spice, raspberry, rose, parchment, pistachio, cloud blue, denim, cloud blue.
9: camel, storm blue, saffron, spice, pomegranate, gold, rose, camel, saffron.

SORRY to anyone who has already made these to round 8 but I'm afraid for the sake of the design and colour i had to change the 2 one round 8 to ROSE, as you can see in the list in RED.


DIAMOND/SPEAR INFILLS
If you are keeping up with me and want to keep going them the first colour round of the Diamonds is

First circle round
8 Centre circles each of 


SAFFRON
CAMEL
GOLD

ROSE
SPICE
POMEGRANATE

SAGE
DENIM
CLOUD BLUE. 
That is 2 of each colour on each of the 9 centre motifs + 18 for each one

The second round of these diamonds and joining round will be 
NEXT WEEK


almost ready to join the circles together...how I'm still not sure, but i will be by next week 

Saturday, 28 January 2017

SPINNING TOP BLANKET: Colour sequence to round 8

SPINNING TOP BLANKET 
Make 4 or 9 Motifs
approx. 16" each

Stylecraft Aran and Alpaca tweed dk
5mm hook

Can be made in DK, but would be smaller 


COLOURS SEQUENCE FOR 9 MOTIFS TO ROUND 8

1: pistachio, sage, cloud blue, storm blue, pistachio, camel, raspberry, spice
2: sage, pistachio, parchment, denim, camel, spice, duck egg, sea breeze,
3: duck egg, denim, pistachio, gold, saffron, sage, spice, rose
4: denim, parchment, rose, raspberry, spice, saffron, storm blue, cloud blue
5: rose, pomegranate, spice, pistachio, sage, sea breeze, camel, duck egg
6: pomegranate, rose, gold, sage, cloud blue, denim, saffron, pistachio,
7: spice, saffron, duck egg, parchment, rose, raspberry, pomegranate, storm blue,
8: saffron, spice, raspberry, rose, parchment, pistachio, cloud blue, denim
9: camel, storm blue, saffron, spice, pomegranate, gold, rose, camel,


                               LINK TO POST 2: UPDATE COLOURS TO ROUND 5


ROUND 8


Round 9 
JOINING TOGETHER
& BORDER TO COME


Friday, 27 January 2017

SPINNING TOP BLANKET UPDATE 2: Colours to round 7


LINK TO POST 1: LINK TO PATTERN AND YARN

LINK TO POAT 2: UPDATE COLOURS TO ROUND 5


COLOURS SEQUENCE FOR 9 MOTIFS TO ROUND 7

1: pistachio, sage, cloud blue, storm blue, pistachio, camel, raspberry
2: sage, pistachio, parchment, denim, camel, spice, duck egg
3: duck egg, denim, pistachio, gold, saffron, sage, spice
4: denim, parchment, rose, raspberry, spice, saffron, storm blue
5: rose, pomegranate, spice, pistachio, sage, sea breeze, camel,
6: pomegranate, rose, gold, sage, cloud blue, denim, saffron,
7: spice, saffron, duck egg, parchment, rose, raspberry, pomegranate,
8: saffron, spice, raspberry, rose, parchment, pistachio, cloud blue
9: camel, storm blue,saffron, spice, pomegranate, gold, rose


making progress but the bigger they get the longer it takes to do a round
Getting there slowly..


Thursday, 26 January 2017

SPINNING TOP BANKET PROGRESS

The First 5 Rounds in one day on 9 motifs


The first 3 round...

All 16 Colours of Stylecraft Aran to be used in pack


FIRST 5 ROUNDS 
1: pistachio, sage, cloud blue,storm blue, pistachio

2: sage, pistachio, parchment, denim, camel

3: duck egg, denim, pistachio, gold, saffron
 
4: denim, parchment, rose, raspberry, spice

5: rose, pomegranate, spice, pistachio, sage


6: pomegranate, rose, gold, sage, cloud blue


7: spice, saffron, duck egg, parchment, rose

 8: saffron, spice, raspberry, rose, parchment

9: camel, storm blue,saffron, spice, pomegranate


Update tomorrow, hoping to get to round 9 on most of them today ready for an update tomorrow


Yarn Pack if wanted 
HERE


Wednesday, 25 January 2017

SPINNING TOP BLANKET: To go with the 2 Cushions from the cushion CAL

For those itching to start the blanket you can make a start by making 4 or 9 cushion fronts to round 9 then add the diamonds for part 1 of the blanket.

SPINNING TOP BLANKET
Aran and 5mm hook 
but you could make it in dk but it will be a lot smaller 

4 motifs will give you a smaller square approx. 36" 91.5cm square lap blanket and the 9 motif blanket will give you a much larger blanket, approx. 52" 132cm square.

Don't join them together just make them to the diamond stage


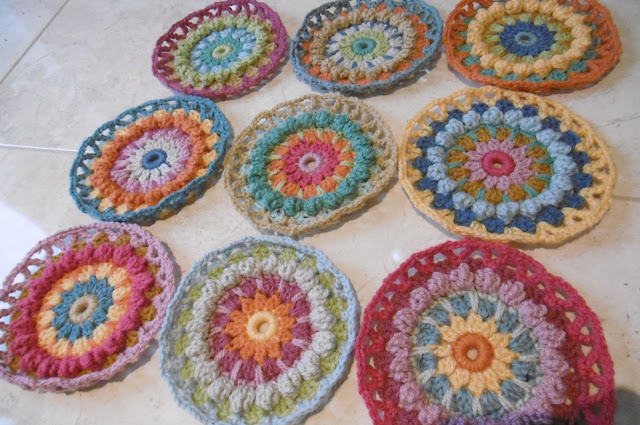
In this picture the motifs are all the same colour way as a photographic idea of what they could look like.

USING THE COLOUR PACK:
I am going to make everyone in a different colour way and can add the colour sequence for each one as i make them, for you to copy if you want. 

Please feel free to use your own colour combinations but remember if you have the yarn pack you will need to use equal amounts of each colour or you might run out of one or another colour

Make one in these colours so there is a link to the cushion or make your first one in the same colours as your cushion.

Hope this helps those who want to get on with the blanket. i will try to post a new colour way each day for the next 9 days.

Part 2:
JOINING THE CIRCLE MOTIF'S TOGETHER

Part 3/4: 
THE BORDER.
Based on the panels in the square cushion so the blanket will have a link to both cushions 


COLOURS BEING USED 

The same as I am using or an all Acrylic pack 
Yarn Packs HERE

LINKS TO PATTERNS TO MAKE THE CUSHION FRONT X 9 
TO DIAMOND INFILL FOR BLANKET

PART 1: PATTERN HERE CENTRE MOTIF

PART 2: PATTERN HERE DIAMOND INFILL

UPDATE:

First 3 rounds on all 9 motifs

1: pistachio, sage, cloud blue
2: sage, pistachio, parchment
3: duck egg, denim, pistachio
4: denim, parchment, rose
5: rose, pomegranate, spice
6: pomegranate, rose, gold
7: spice, saffron, duck egg, 
8: saffron, spice, raspberry
9: camel, storm blue,saffron


Tuesday, 24 January 2017

CUSHION CAL: Square cushion 2nd Panel

I did decide to simplify the square cushion so i could do the circular cushion as well as the blanket, but lots have asked for the 3 different panels for the one side of the Square cushion so here is the 2nd Star panel


The Star Panel
Aran yarn
5mm hook


Finger wrap of 6 wraps, 
Round 1: 12 sc [dc], into circle, sl st to complete.

NOTE: ROUND 2 IS THE JOIN AS YOU GO ROUND.  

Round 2: att. new colour in any st, ch1, [counts as fist sc (dc)], dc [tr], into the same st, ch3, dc [tr] and sc [dc],  into the next st, sc [dc], dc [tr], into next st, ch3, dc [tr], sc [dc], into the next st, repeat the star point 4 more times,  sl st to complete. (6 star points)

Make a row of 7 stars join as you go using the 2nd ch st as a sl st to join 2 star points together.


NOTE: TO MAKE THE ROW OF 7 STARS INTO A PANEL USE THE SAME PATTERN AS FOR THE HEX PANEL.


FINISHING BANDS
 Add a ch st base and 4 rows of hdc [htr] to both sides of the 7 STARS row.


ROW1: First colour, Att. yarn with a tr [dtr], standing start, ch 3, sc [dc],  into next point of the first STAR,
ch3, tr [dtr], into dip between the first 2 STARS 
repeat to end of row, finish with a tr [dtr], in the last ch1 point of the last STAR in row.


 ROW2: ch2, turn, 3hdc [3htr], into the ch3 sp,
1hdc [1htr], into the next st,  3hdc [3htr], into next sp, hdc [htr], into next st, repeat to end finish with 3hdc [3htr] in last ch3 sp. (56sts)


 ROW 3: change colour, ch2 turn, hdc [htr],into first st.
1hdc [1htr], in every st to end (56sts)

ROW 4: Repeat row 3. (56sts)


Friday, 20 January 2017

CUSHION CAL: Easy Peasy Alternative back

Hope you enjoyed the circular cushion cal?
This is an easy drawstring back for a circular cushion.

For those waiting for the next parts to the 
SQUARE CUSHION
ALL pattern parts will be completed next week.

EASY PEASY DRAWSTRING CIRCUALR CUSHION BACK
If you would prefer to make a simple draw string back to you cushion, continue to crochet a number of rounds in the dc [tr], after the 12 rounds of sc, [dc], until the tube almost meets at the back of the cushion.

Add a last row of dc [tr], and make a draw string  and thread it through the last row pull up and you have another easy alternative to a round cushion fastening.


This pictures is of a drawstring back made in dc [tr] instead of sc [dc], 


 DRAWSTRING PATTERN

Make a finger wrap of 4 wraps.
12sc (12dc)into ring, sl st, to complete

ch about 90sts, long enough to allow a cushion pad through the hole.

Then do 6sc (6dc) into the second st from the hook, one side of the ch cord 
and 6sc (6dc)the other side of the ch cord, sl st to complete.


Weave the drawstring in and out of every two dc on the last round of cushion opening. 

Pull up and tie in a bow.

Thursday, 19 January 2017

CUSHION CAL PART 4: Button band and joining

Hope you are all managing the circular motif for the cushion? 
If you want to make a reversible cushion, maybe just changing the colours for each side, then you need to have made 2 circular cushion fronts to continue with this join
All worked in sc [dc]


BUTTON BAND
make a button band with 6 rows of sc [dc], and covering 6 triangle edges and the points of the diamond/spear shapes
I've used the same colour as the final pert 4 triangle in fills, Parchment
put a stitch marker for the start and finish sp.


ROW 1: att yarn in ch3 sp of the first diamond, sc [dc], in the next 5sts, sc [dc], in the next 3 sps, (that's the ch3 sp of the triangle), the next ch3 sp, ( the diamond) and the ch3 sp of the next triangle.

then repeat sc [dc],  in next 5 sts, and the next 3 x ch3 sps, until you cover 6 triangles
 finish with sc [dc], in the ch3 sp of the diamond and reach the next marker ( 49sts)

 ROW 2: ch1 turn sc [dc], in first st and every st to end (49sts)

ROWS 3-6: Repeat row 2.  (49sts0


JOINING TWO FRONT TOGETHER

ROW 1: Att, yarn in the same diamond point as you did the button band in. 
So for that first sp there will be 2 sts, one from the button band and one for the side of the cushion, 
sc in the next ch3 sp, sc [dc], in next 5sts, sc [dc], in next 3 x ch3 sps, repeat to start of button band.


Now you need to make an opening and replace the sts you used for the button band, 
ch 48sts, sl st into the first st, cut off and weave in ends


ROW 2-12: Change colour for each row repeat sc [dc], in every st 


ROW 12:  Join the band and cushion front to the second front matching the stitches as you did row 1 of  band into 5sts, and the 3 spaces between 


TO FINISH 
Add a strip of velcro to the button band opening
You can add buttons as decoration or leave the band to shine...i fi was adding buttons i would add them all around the band as a design feature or make some buttons using the bead pattern maybe?


MORE DETAILS FOR BUTTON BAND
Joining reversible #10 cushion using button band
TERESA DAY·SUNDAY, 22 JANUARY 2017...Thank you Teresa very useful
To make the reversible version of the cushion, you first make two of the mandala/star patterns, so you have two completed circles. A striped cylinder, with an opening that allows you to put the cushion pad in, connects these two circles – that cylinder incorporates a button band/flap.
For the joining cylinder band the stitches you will work into are:
18 triangles (5 stitches and 2 chain 3 spaces) = 7 stitches
AND
1 stitch into each of the chain 3 spaces of 18 diamonds (the spikes at the top)
which will give you 144 stitches in total – the cylinder band is created by doing 12 rows of sc (dc) creating coloured stripes.
Before you make the cylinder you make the ‘button’ band, which is the flap that tucks inside the cushion closing, and to which you attach the fastening to close the cushion once you’ve inserted the pad.
This flap is crocheted directly on to the cushion side, which means that you will need to ‘duplicate’ the stitches used to create the flap when you make the cylinder – this is done by chaining across the space, and that chain then acts as the foundation chain for the stitches that are needed to make the cylinder shape (which would otherwise be missing the stitches used to create the flap).
The flap is worked into 49 stitches – when you have finished making it, you reattach your yarn to the stitch at the base of the cylinder (i.e. the last stitch that you used on the first row of the flap) and work around the circle until you get to the other side of the flap, you then start the chain to cross the gap, and slip stitch back into the first stitch of this round thus creating a complete circle, you then work up that circle to create the cylinder.

Here are Sue’s instructions with a few bits added in italics to help to explain…
· Make a button band with 6 rows of sc [dc], and covering 6 triangle edges and the points of the diamond/spear shapes
· Put a stitch marker for the start and finish sp.
· ROW 1: att yarn in ch3 sp of the first diamond, *sc [dc], in the next 5sts, sc [dc], in the next 3 sps**, [they are the ch3 spaces in the top corner of the triangle, the top of the diamond, and the top corner of the next triangle]
Repeat from * to ** five times (you will have worked across six triangles altogether)
· Finish with sc [dc], in the ch3 sp of the next diamond (you should now have reached the second marker (49sts)
· ROW 2: ch1 turn sc [dc], in first st and every st to end (49sts)
· ROWS 3-6: Repeat row 2 (49sts)
This will have created the button flap
JOINING TWO FRONTS TOGETHER
· ROW 1: Att yarn in the same diamond point as you did the button band in
(this will be at the end of that first row of the button band, because you are now going to be completing that first row across the triangles that were not used to create the button band)
· So for that first sp there will be 2 sts, one from the button band and one for the side of the cushion,
· sc in the next ch3 sp, sc [dc], in next 5sts, sc [dc], in next 3 x ch3 sps, repeat to start of button band.
· Now you need to make an opening and replace the sts you used for the button band, 
· ch 48sts, sl st into the first st, cut off and weave in ends (this chain will be the foundation row for the stitches that cross the gap that create the opening to allow you to get the cushion pad in and out – they form the first row of the stripy cylinder, along with the 96 stitches you have made across the 12 triangles not used in the ‘flap’ section)
Now continue with this section of the pattern which is on Sue’s blog...
PRINT FRIENDLY COPY
for personal use only
HERE