BLACK TULIP BLANKET PATTERN
US Terms
Stripes 20% wool yarn from Wilko's..a fab find
4mm hook
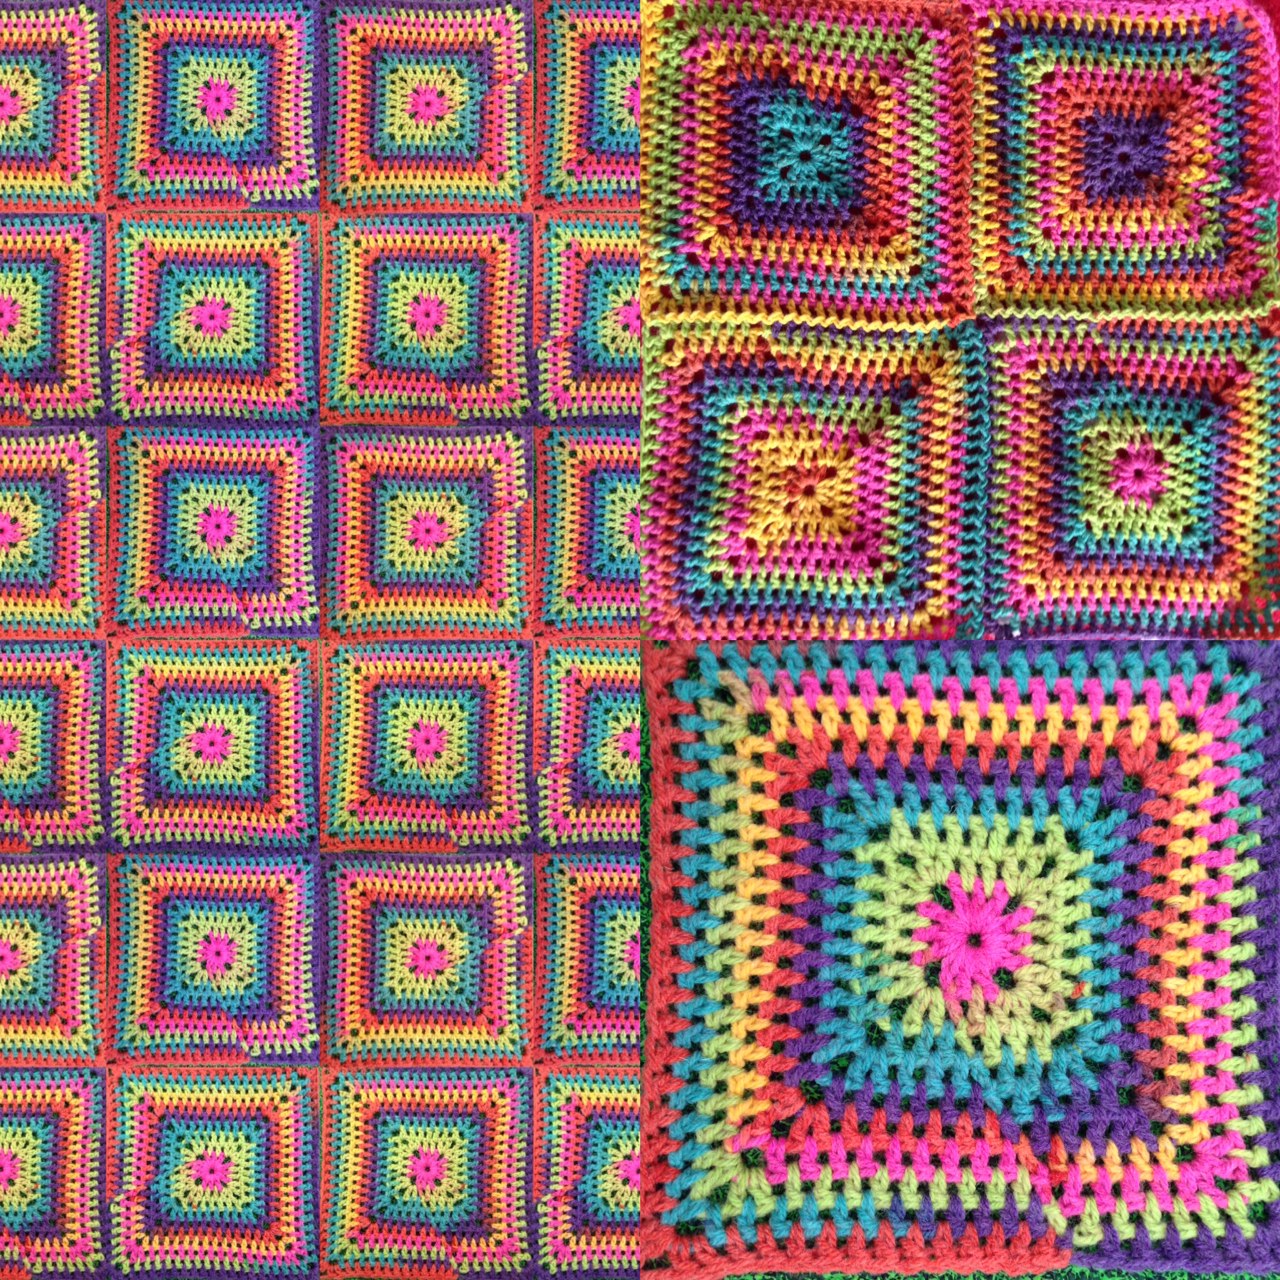
And using my Alternative Solid Granny Square

 above is a block of 4 squares repeated to look like a blanket..gives you a good idea of what one will look like
US Terms
Stripes 20% wool yarn from Wilko's..a fab find
4mm hook
And using my Alternative Solid Granny Square


We all know and use the solid granny square but have you ever tried working the stitches int the spaces instead of the stitches?
Looking for a different look to a solid granny square then give it a go, its gives a more vintage feel to your solid squares. And for a real beginner its easier than finding the stitches to work into.....


4mm hook
dk random dyed yarn
5mm hook
Aran random dyed yarn
6mm hook
2 strands of dk
I'm suggesting random/space dyed yarn but each round could be in a different colour and you can use the original granny square concept of using up left over yarns.
US Terms as always

Pattern:
finger wrap of 5 wraps
ROUND 1: ch2, counts as first dc, 2dc, ch3, 3dc, ch3, 3dc, ch3 3dc ch3, sl st into first sp, cont.[3dc each side]
ROUND 2: Ch2, counts as first dc, dc in each sp, corners, 2dc, ch3, 2dc, dc into each sp, cont. for each side, sl st into the first sp to complete. [6dc each side]
ROUND 3: dc, in each sp, 1dc, ch3, 1dc, in corner sp. [7dc each side]
ROUND 4: dc, in each side sp, 2dc, ch3, 2dc in the corners, will be 10 sts, each side and an even number. [10sts each side]
ROUND 5: dc, in each side sp, 1dc ch3, 1dc in the corners, will be 11sts, and an odd number [11sts each side]
ROUND 6: dc in each side sp, 2dc, ch3, 2dc in each corner, will be 14sts each side and an even number [14sts each side]
ROUND 7: Repeat round 5
ROUND 8: Repeat round 6....
ROUND 9: Repeat round 5
ROUND 10: Repeat round 6

ROUND 9: Repeat round 5
ROUND 10: Repeat round 6

IMPORTANT NOTE: please read.
Always look for the patterns and repeats in pattern, it will help.
Always look for the patterns and repeats in pattern, it will help.
If you have a go at this granny square, you will notice that the increase goes up by a different number of sts, on each round and alternates between odd and even numbers.
This is important as just doing [1dc, ch3 1dc], in the corners, for every round will make your square cup slightly.
And doing [2dc, ch3, 2dc], in every corner will make the square wobbly and not sit flat.
By doing the alternate corner increase you will have a completely flat square and means you can do a large square blanket if you want.
This alternating odd/odd/even number of sts, could open up lots of possibilities for adding different stitches to the outer edge when your throw is completed. Depending on if you finish with an odd or an even row. Personally i would choose an odd number to finish on as this is a more versatile number to work edging stitches into.
For Example: any stitch that needs 2 base sts needs the extra st to balance the st. So an odd number is better, any finish stitch worked into every st, doesn't matter if there is an odd number or an even number.
For Example: any stitch that needs 2 base sts needs the extra st to balance the st. So an odd number is better, any finish stitch worked into every st, doesn't matter if there is an odd number or an even number.
Worked continuously the first and last st, moves along the join side.
Deciding on the Number of squares you want in your blanket
Decide on the size of your square and if you want an odd or an even number of sts to finish with. Measure you square and work out the size of throw you require

Or...Make lots of smaller squares and join as you go using a sl st, into the spaces after completing each st, on the side being joined.
YARN:

For my blanket i am aiming for 6 x 6 squares
Each 8 round square measures approx. 8"/20cm, so with out the border it should measure approx. 48" / 122cm
Each square weighs approx 20g so a 50g ball of the Stripes wool mix from Wilko's should give me 2.5 squares so I will need 14 x 50g balls plus 2or 3 for the border or an alternative yarn to finish it off.
UPDATE: I am actually getting almost 3 squares from a 50g ball.
If you want to get 3 squares from one ball to make the usage smaller then make a 9 round square instead of a 10 round square.
This should give you 3 squares from one 50g ball making the body of the throw 12 balls of yarn instead of 14 balls then all you need is a couple of balls plus for the border yarn.
This change will only make the throw a tiny bit smaller.
 This is a mock up blanket to give you an idea of what will look like but as it's random dyed yarn each square will be slightly different from each other.

 a block of 4 different squares

FINAL DECISION ON MY BLACK TULIP BLANKET
I eventually decided a blanket of 4 x 6 squares, making a generous, wrap around blanket was the right choice for my Black Tulip.


Finishing it with approx. 2" of vertical stripe Moss Stitch and finishing it with a Black tulip edging..taking almost 100g of yarn to complete the 3 row edging.
I split one ball of the Stripes 50g ball of yarn into the green shades, for the
'v' st [leaves], did the tulip head in black popcorn st, and finished with a 3dc, round of granny shells, 4dc in the round corner spaces.
BORDER PATTERN with round corners..
4 x 6 10 round Squares joined as i made them, using a sl st method after every stitch.
Round 1: col.1, black, moss stitch [sc, in every sp, ch1, between, repeat], in every sp, at ch3 coners, sc, ch1, sc, ch1, sc, sl st to complete pull yarn through st, and hold, do this for each round.
 Note: Moss st, in every sp, might seem a lot of extra stitches but Moss st has a tendency to pull up this number of stitches worked perfectly, with extra stitches in all corners, on the 4th round of Moss Stitch
Round 2: Col. 2, stripes yarn, sc in every sp, ch1 between no extra sts, in corners, sl st, to complete.
Round 3: Col.1, black, sc in every sp, ch1, between, no extra sts, in corners,
sl st, to complete

Round 4: Col.2, sc in every sp, ch1 between, in the 2sp, at corners do sc, ch1 sc, in each sp. sl st, to complete.
 on round 4 you can see the increase corner sts.
Round 5: Col. 1, sc in every sp, ch1 between, sl st to complete
Round 6: Col. 2, sc in each sp, ch1 between, sl st, to complete.

Round 7: Col. 1, sc, in every sp, ch1 between, sl st, to complete

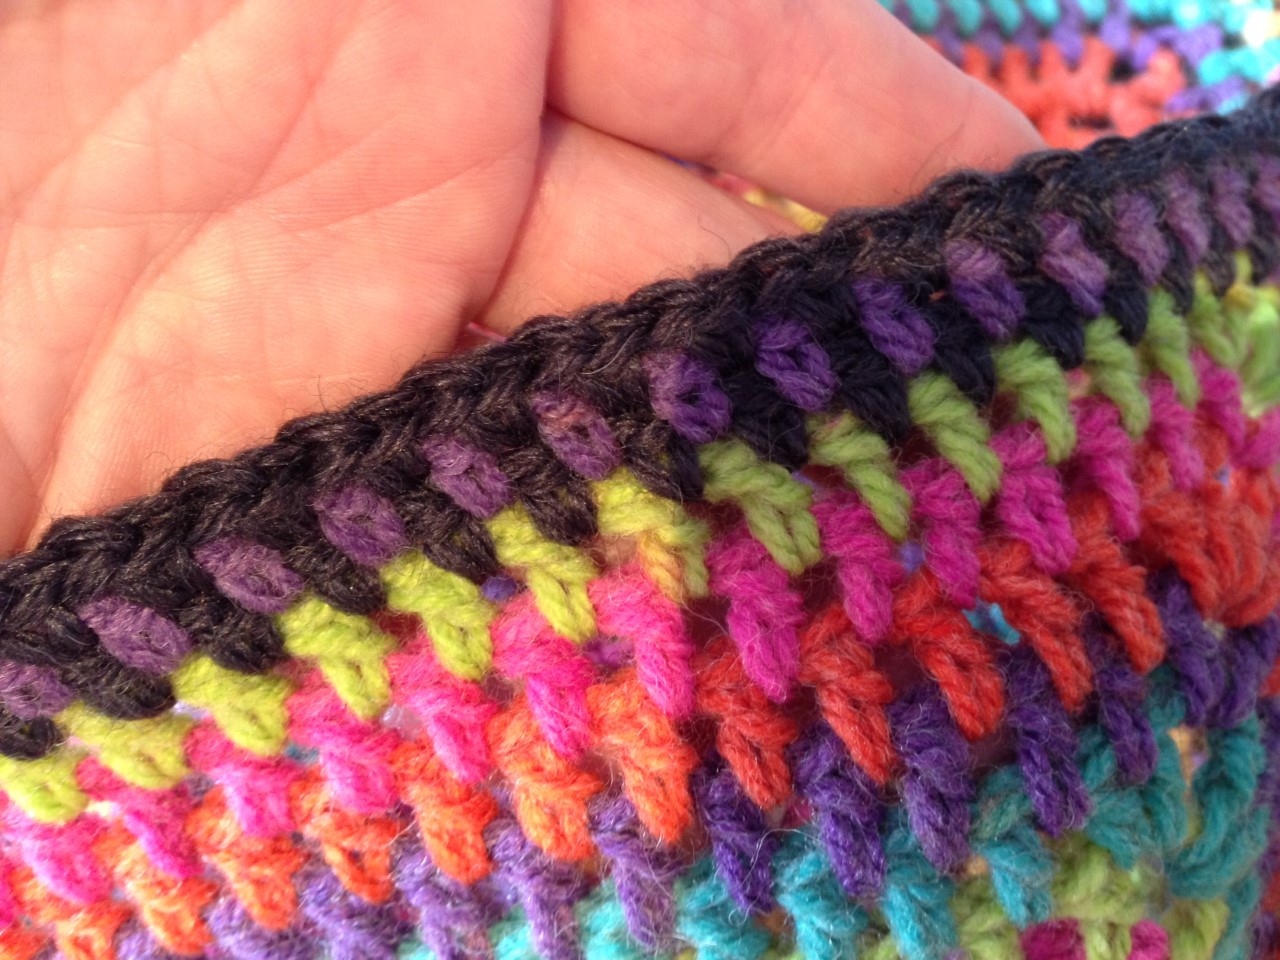
Round 8: Col. 2, Stripes yarn, sc, in every sp, ch1 between, sc, ch1 sc, in each of 2 corner sps, to increase 2 more sts on each corner, picture below.

Round 9: Last round of Moss St, Col. 1, Black, sc in each sp, ch1, between, sl st to complete.
TULIP STITCH FINISH
ROUND 10: Using the green shades only, from the Stripes yarn to create the leaf effect. First round of 3 round Tulip Stitch.
'v' stitch [dc, ch1, dc] in every other sp. But with a 'v' stitch in all of the 8 corner sps, sl st, to complete cut off and weave end.


Round 11: 5dc popcorn st, [5dc, sl st, into ch3 sp between popcorns], ch3, [tulip head], in each 'v' [leaf], sl st to complete cut and weave in ends.

Round 12: Using col 2. Remaining orange, yellow, pink, purple, Shades,
3dc, in every ch3 sp, 4dc, in 8 x ch3 corner sps, sl st, to complete, cut and weave in end


Below is the back of the Black Tulip Blanket

YARN:

For my blanket i am aiming for 6 x 6 squares
Each 8 round square measures approx. 8"/20cm, so with out the border it should measure approx. 48" / 122cm
Each square weighs approx 20g so a 50g ball of the Stripes wool mix from Wilko's should give me 2.5 squares so I will need 14 x 50g balls plus 2or 3 for the border or an alternative yarn to finish it off.
UPDATE: I am actually getting almost 3 squares from a 50g ball.
If you want to get 3 squares from one ball to make the usage smaller then make a 9 round square instead of a 10 round square.
This should give you 3 squares from one 50g ball making the body of the throw 12 balls of yarn instead of 14 balls then all you need is a couple of balls plus for the border yarn.
This change will only make the throw a tiny bit smaller.


I eventually decided a blanket of 4 x 6 squares, making a generous, wrap around blanket was the right choice for my Black Tulip.


Finishing it with approx. 2" of vertical stripe Moss Stitch and finishing it with a Black tulip edging..taking almost 100g of yarn to complete the 3 row edging.
I split one ball of the Stripes 50g ball of yarn into the green shades, for the
'v' st [leaves], did the tulip head in black popcorn st, and finished with a 3dc, round of granny shells, 4dc in the round corner spaces.
BORDER PATTERN with round corners..
4 x 6 10 round Squares joined as i made them, using a sl st method after every stitch.
Round 1: col.1, black, moss stitch [sc, in every sp, ch1, between, repeat], in every sp, at ch3 coners, sc, ch1, sc, ch1, sc, sl st to complete pull yarn through st, and hold, do this for each round.
Round 2: Col. 2, stripes yarn, sc in every sp, ch1 between no extra sts, in corners, sl st, to complete.
Round 3: Col.1, black, sc in every sp, ch1, between, no extra sts, in corners,
sl st, to complete

Round 4: Col.2, sc in every sp, ch1 between, in the 2sp, at corners do sc, ch1 sc, in each sp. sl st, to complete.

Round 5: Col. 1, sc in every sp, ch1 between, sl st to complete
Round 6: Col. 2, sc in each sp, ch1 between, sl st, to complete.

Round 7: Col. 1, sc, in every sp, ch1 between, sl st, to complete

Round 8: Col. 2, Stripes yarn, sc, in every sp, ch1 between, sc, ch1 sc, in each of 2 corner sps, to increase 2 more sts on each corner, picture below.

Round 9: Last round of Moss St, Col. 1, Black, sc in each sp, ch1, between, sl st to complete.
TULIP STITCH FINISH
ROUND 10: Using the green shades only, from the Stripes yarn to create the leaf effect. First round of 3 round Tulip Stitch.
'v' stitch [dc, ch1, dc] in every other sp. But with a 'v' stitch in all of the 8 corner sps, sl st, to complete cut off and weave end.


Round 11: 5dc popcorn st, [5dc, sl st, into ch3 sp between popcorns], ch3, [tulip head], in each 'v' [leaf], sl st to complete cut and weave in ends.

Round 12: Using col 2. Remaining orange, yellow, pink, purple, Shades,
3dc, in every ch3 sp, 4dc, in 8 x ch3 corner sps, sl st, to complete, cut and weave in end


No comments:
Post a Comment